
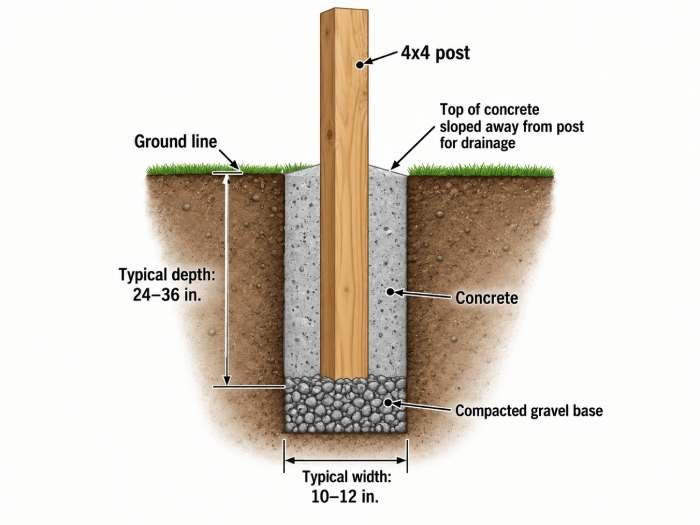
To set a fence post in concrete, dig a hole deep enough for local soil and frost conditions, place the post plumb, brace it firmly, then fill around it with properly mixed concrete while keeping the post aligned.
For most residential fence work, the key decisions are hole depth, hole width, drainage, post alignment, and how much concrete to use. A post that is set too shallow, poorly braced, or surrounded by loose soil can lean even if the concrete itself is strong.
Quick Answer
How deep should a fence post be set in concrete?
For many residential fence posts, 24 to 36 inches is a common starting range, but the correct depth depends on fence height, soil, wind exposure, and local frost requirements. In freezing climates, the bottom of the footing may need to extend below the local frost line, and gate posts or tall solid-panel fences may need deeper footings.
How wide should the concrete hole be?
A practical rule is to make the hole about three times the post width. For a nominal 4×4 post, a hole around 10 to 12 inches wide is common. Wider holes may be needed in weak soil or for gate posts that carry more load.
Rule of thumb: Use enough depth and width to resist movement, keep several inches of compacted gravel at the bottom when drainage is needed, and never reduce the footing just to save a bag or two of concrete.
Estimate the footing before you mix
Enter the hole dimensions first so you know whether the job needs a few bags or enough concrete to justify a larger mixing plan.
Best setup for a typical DIY fence post
- Dig below loose topsoil and deep enough for the fence height, local frost conditions, and soil strength.
- Make the hole wider at the bottom or at least avoid a narrow “neck” that can let frost lift the footing.
- Brace the post in two directions before concrete goes in.
- Mix concrete to a workable consistency, place it around the post, consolidate it, and recheck plumb.
- Slope the top of the concrete away from wood posts so water does not sit against the post.
1. Choose the Right Post Depth and Hole Size
Post depth matters more than many DIYers expect because the buried section is what resists wind, fence-panel leverage, gate movement, and seasonal soil movement. A short privacy fence on dense, well-drained soil is not the same job as a 6-foot solid-panel fence exposed to wind.
Start with 24 to 36 inches, then check local conditions
For many residential fences, a hole around 24 to 36 inches deep is a practical planning range. That is not a universal code rule. Frost depth, local building requirements, soil type, fence height, wind exposure, and whether the post supports a gate can all push the required depth deeper. In cold regions, local frost-depth requirements may control the final depth. For a deeper look at choosing embedment, see
how deep fence post footings should be.
If you are comparing several possible footing dimensions, the
footing size pages
can help you see pre-calculated concrete quantities before you start digging.
Use enough width around the post
For a 4×4 wood post, a 10- to 12-inch-wide hole is common. A larger 6×6 gate post may need a wider footing. The goal is not simply to surround the post with a thin shell of concrete; the concrete mass must be large enough to spread load into the surrounding soil. If you set the post in a round cardboard tube form, compare round concrete form sizes and the concrete each diameter needs.
For example, a 12 x 12 x 24-inch square footing has a volume of 2 cubic feet. That is about 0.074 cubic yards before waste. You can compare that example directly with the
12x12x24 footing example
when planning a square post footing.
2. Check Utilities, Frost Depth, and Soil Before Digging
Before digging any post hole, have underground utilities located through the appropriate local service. A fence line can cross electrical, gas, communication, irrigation, drainage, and other buried systems. Local setback and permit rules can also affect where the fence is allowed to go.
Frost can move shallow footings
In freezing climates, wet soil can expand and lift a shallow footing. A footing that sits within an active frost zone may heave upward even if the post was perfectly plumb on installation day. Local code departments and experienced local contractors are better references for frost-depth requirements than a single national rule.
Soft or disturbed soil needs extra care
Loose fill, wet clay, organic topsoil, and recently disturbed ground provide less support than firm native soil. Dig until the bottom is stable. If the hole walls collapse or the bottom stays muddy, correct that condition rather than pouring concrete into unstable material.
If you want a broader reminder of what can go wrong during small concrete jobs, review the
common concrete mistakes to avoid.
The application is different, but poor base conditions, adding too much water, and rushing placement create similar durability problems.
3. Prepare the Hole and the Post
Dig the hole to the planned depth and remove loose soil from the bottom. For wood posts in areas where drainage is a concern, a few inches of compacted gravel at the bottom can help prevent water from collecting directly under the post. Do not count loose gravel as structural depth unless your design specifically allows for it.
Set the post before adding concrete
Place the post in the hole, then check it with a level on two adjacent faces. Position it to match the fence line and the height of the other posts. Brace it with temporary boards or stakes in two directions so it cannot rotate or lean while you place concrete.
Take time here. Once concrete is in the hole, small alignment corrections become harder. Check the fence line from several posts away instead of judging one post in isolation.
Protect wood where practical
Use posts rated for ground contact when the project calls for wood in contact with soil or concrete. At the top of the footing, shape the concrete so it sheds water away from the post rather than forming a bowl that holds water.
4. Estimate How Much Concrete You Need
The amount of concrete depends on the hole size minus the volume displaced by the post. For small DIY jobs, it is usually smarter to round up than to stop halfway through a footing because the last bag ran out.
Use the
concrete estimator
when you want the total volume for multiple posts or mixed shapes. For bagged material, the
concrete bag calculator
converts required volume into common bag sizes.
Bag yield example
Using the site yield assumptions, one 80 lb bag makes about 0.60 ft³, one 60 lb bag about 0.45 ft³, and one 40 lb bag about 0.30 ft³. A 2 ft³ footing would therefore require about 3.34 80 lb bags before subtracting post displacement or adding waste, so a DIYer would normally round up rather than buy exactly the theoretical minimum.
If you are unsure whether bagged mix still makes sense for the total number of posts, compare the tradeoffs in the
bagged vs. ready-mix concrete cost comparison.
Small fence jobs often favor bags because they are easy to stage one footing at a time, while a large number of heavy footings can change the labor and cost equation.
| Example Hole | Gross Volume | Approx. 80 lb Bags |
|---|---|---|
| 10 x 10 x 24 in. | 1.16 ft³ | 1.93 bags |
| 12 x 12 x 24 in. | 2.00 ft³ | 3.34 bags |
| 12 x 12 x 30 in. | 2.50 ft³ | 4.17 bags |
These figures are gross hole volumes and do not subtract the post itself. They are useful for planning, but buy with a small margin for spillage, irregular hole walls, and field variation.
5. Mix and Place the Concrete Correctly
For the most predictable result, mix bagged concrete according to the product instructions before placing it in the hole. Add only enough water to reach the required workable consistency. Excess water may make placement easier, but it can weaken the cured concrete and increase shrinkage.
Place in lifts and remove large air pockets
Shovel or pour the concrete around the post, working from all sides. Rod the mix with a stick or narrow tool to help fill voids around the post and along the sidewalls. Do not hammer the post aggressively after the hole is full because that can throw the alignment off.
Check plumb more than once
After the hole is filled, check both faces of the post again. Then sight down the fence line. Tighten the braces before leaving the post to cure. A post that moves during the first hours can harden permanently out of plumb.
For most ordinary fence footings, selecting a stronger mix is less important than proper hole geometry, water control, and placement. If you are choosing between common strengths, the
3000 vs. 4000 PSI concrete guide
explains what PSI means and when additional strength may matter.
6. Finish the Top and Let the Footing Cure
Bring the concrete slightly above surrounding grade and slope the surface away from a wood post. This helps reduce standing water at the post-to-concrete interface. For metal posts, follow the fence system details for drainage, sleeves, caps, and corrosion protection.
Keep the post braced until the concrete has hardened enough that the post will not move when the braces are removed. Exact timing depends on the mix, temperature, weather, and load. Do not treat “hard to the touch” as the same thing as fully cured concrete.
Concrete continues gaining strength over time. The
concrete curing basics
cover moisture retention, temperature, and why early-age curing matters. Avoid hanging a heavy gate or applying strong fence-panel loads before the footing has had adequate time to develop strength.
7. When to Use Concrete and When to Consider Another Method
Concrete is useful when a post must resist significant lateral load, when the soil alone will not hold the post firmly, or when the post supports a gate. It also creates a repeatable installation when the fence line crosses variable soil.
Concrete may be unnecessary for some light-duty agricultural or temporary fence systems where driven posts or compacted aggregate are the normal method. If you are deciding between materials, the
concrete vs. gravel for fence posts
comparison weighs the options. Wood durability and drainage also matter. A poorly detailed wood post can decay even if the footing is strong.
Call a professional when the fence behaves like a structure
Get local professional guidance for retaining walls with fences on top, very tall privacy fences, large solid gates, fences exposed to extreme wind, footings near slopes, or any installation where a failed post could damage property or injure someone. Local code may also require engineered details in specific conditions.
Tools & Next Steps
Calculate your post footing
Enter footing dimensions to estimate concrete volume before buying bags or scheduling a pour.
Compare common footing sizes
Use pre-calculated examples to compare dimensions and quantities for typical footing layouts.
Frequently Asked Questions
How deep should a fence post be in concrete?
For many residential posts, 24 to 36 inches is a common planning range, but there is no single depth that fits every fence. The final depth should account for frost line, soil strength, fence height, wind exposure, and local code. Gate posts and tall privacy fences often need deeper or larger footings.
How much concrete do I need for one fence post?
It depends on the hole diameter or width, hole depth, and post size. A 12 x 12 x 24-inch square hole has a gross volume of 2 ft³, which is about 3.34 bags at 0.60 ft³ per 80 lb bag before post displacement, waste, and rounding.
Should I put gravel under a fence post?
Gravel can be useful where drainage is a concern. A few inches of compacted gravel can help keep water from collecting at the bottom, but the hole still needs adequate structural depth and stable soil beneath it.
Can I pour dry concrete mix into a fence post hole and add water?
Use the installation method allowed by the specific concrete product. Some bagged products are designed for dry placement in post holes, while conventional mixes are intended to be mixed with water first. Follow the bag instructions rather than assuming every mix works the same way.
How long should concrete cure before attaching fence panels?
Wait until the footing has developed enough strength for the load you are adding. Timing varies with the mix, temperature, weather, and panel weight. Light work may be possible earlier, but heavy panels and gates should not be used to test fresh concrete.
Should concrete around a wood fence post be above ground?
Yes, the top is commonly finished slightly above grade and sloped away from the post. This helps shed surface water instead of allowing it to sit against the wood.
Do gate posts need more concrete than regular fence posts?
Often, yes. Gate posts carry the weight and leverage of the gate and also experience repeated movement. They commonly need deeper, wider, or otherwise more substantial footings than line posts.
Is 3000 PSI concrete strong enough for fence posts?
For many ordinary residential post footings, properly placed 3000 PSI concrete can be adequate. The correct specification depends on exposure, structural demand, local requirements, and the project design. Footing size and soil support are just as important as compressive strength.
Plan the footing before you set the post
Disclaimer
This guide is general information for residential DIY planning, not a site-specific structural design. Fence depth, footing size, frost protection, property-line rules, utility clearances, wind requirements, and permit rules vary by location. Verify local requirements before digging, and consult a qualified contractor or engineer for structural, high-wind, gate, slope, retaining-wall, or other higher-risk installations.