
Concrete control joints are commonly spaced about 24 to 36 times the slab thickness, with panels kept as square as possible. For a typical 4-inch slab, that works out to roughly 8–12 feet between joints, with about 10 feet being a practical planning target for many residential slabs.
Control joints—more precisely called contraction joints—do not prevent concrete from cracking. Instead, they create planned weak lines so normal shrinkage cracking is more likely to occur inside the joint rather than randomly across the visible slab.
Quick Answer
How far apart should control joints be in concrete?
A common rule is 24–36 times the slab thickness. That gives approximately 8–12 feet for a 4-inch slab and 12–18 feet for a 6-inch slab, although NRMCA also recommends limiting joint spacing to about 15 feet maximum as a general guideline.
How deep should a concrete control joint be?
Conventional saw-cut contraction joints should generally be at least one-quarter of the slab thickness. For a 4-inch slab, that means approximately 1 inch deep. Early-entry saw systems can use different details when installed according to their intended method.
What shape should the joint layout create?
Keep slab panels square or as close to square as practical. Avoid long narrow panels, L-shaped panels, and layouts where the panel length exceeds about 1.5 times its width.
The joint is a planned crack
A contraction joint intentionally weakens the slab along a straight line. As the concrete shrinks, the goal is for the crack to form below that joint instead of running randomly across the surface.
Control joint rules of thumb
- Spacing: approximately 24–36 times slab thickness.
- 4-inch slab: approximately 8–12 ft; around 10 ft is a useful planning target.
- Maximum general spacing: about 15 ft under NRMCA guidance.
- Panel shape: square is preferred; keep length-to-width ratio at 1.5:1 or less.
- Conventional saw-cut depth: at least 1/4 of slab thickness.
- Timing: cut after the concrete is strong enough to avoid excessive raveling but before random cracking develops.
1. Concrete Control Joint Spacing Chart
The 24–36-times-thickness rule gives a useful starting point for ordinary slabs-on-ground. It is not a substitute for engineered joint design on structural, industrial, post-tensioned, heavily loaded, or unusual slabs.
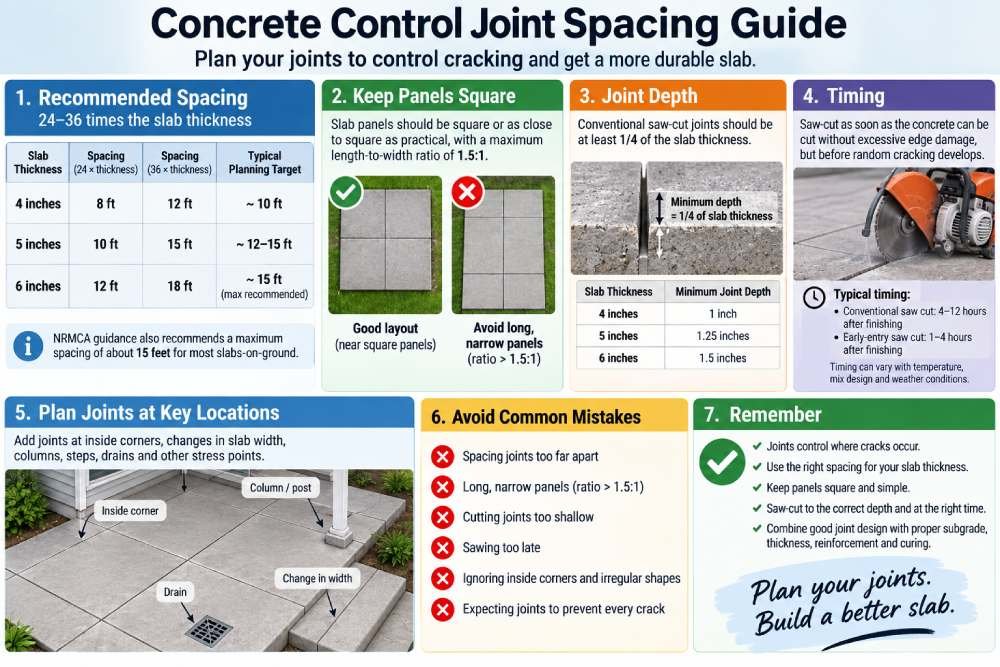
| Slab Thickness | 24× Thickness | 36× Thickness | Practical Planning Note |
|---|---|---|---|
| 4 in. | 8 ft | 12 ft | About 10 ft is a common planning target |
| 5 in. | 10 ft | 15 ft | Keep panels near square |
| 6 in. | 12 ft | 18 ft | General NRMCA guidance still recommends about 15 ft maximum |
Do not use the largest number automatically. Concrete mixture shrinkage, temperature, reinforcement, base friction, slab restraints, geometry, weather, and project use can all affect the appropriate joint layout.
If you have not decided on slab thickness yet, review the
4-inch vs. 6-inch concrete slab guide
before finalizing the joint spacing.
2. Why Concrete Needs Control Joints
Concrete normally shrinks as moisture leaves the material and the slab develops strength. Temperature changes can also cause dimensional movement.
The slab is restrained by its base, adjacent structures, reinforcement, changes in thickness, and its own geometry. When the resulting tensile stress exceeds the young concrete’s capacity, a crack forms.
You generally cannot eliminate that shrinkage simply by adding reinforcement or using stronger concrete.
A contraction joint provides a deliberately weakened plane so the crack is encouraged to form in a predictable location.
If your slab has already developed uncontrolled cracking, see
why concrete cracks
to identify the likely cause before deciding whether repair is necessary.
3. Keep Concrete Panels as Square as Possible
Spacing alone does not make a good joint layout. Panel shape matters just as much.
A square 10 × 10-foot panel generally has a more favorable layout than a 5 × 20-foot panel, even though both contain 100 square feet.
For ordinary slabs, aim for:
- Square panels whenever practical
- Rectangular panels no longer than about 1.5 times their width
- Continuous joint lines rather than staggered joints
- No L-shaped or T-shaped panels when they can reasonably be avoided
Example: a 12 × 20 ft patio
Consider a 12 × 20-foot, 4-inch patio. Leaving the entire slab as one 12 × 20 panel gives an aspect ratio of approximately 1.67:1, which exceeds the preferred 1.5:1 maximum.
One simple concept would be to divide the 20-foot dimension into two approximately 10 × 12-foot panels. Each panel would have a 1.2:1 aspect ratio and would be much closer to square.
You can review the concrete quantity for that same slab on the
12×20 4-inch slab page.
4. Pay Special Attention to Inside Corners and Irregular Shapes
Random cracks often start where slab geometry creates a stress concentration.
Common trouble areas include:
- Inside corners
- Door openings
- Columns
- Steps
- Drain openings
- Utility penetrations
- Changes in slab width
- Complex patio or walkway shapes
Do not create an L-shaped panel if a joint can divide it into simpler rectangular sections.
At reentrant—or inside—corners, a joint line is often planned to extend outward from the corner so shrinkage has a controlled path rather than creating a diagonal random crack.
This is one of the layout mistakes discussed in the
common concrete slab mistakes guide.
5. How Deep Should Control Joints Be?
For conventional saw-cut contraction joints, the groove should generally be at least one-quarter of the slab thickness.
| Slab Thickness | Typical Minimum Conventional Saw-Cut Depth |
|---|---|
| 4 in. | 1 in. |
| 5 in. | 1.25 in. |
| 6 in. | 1.5 in. |
The purpose is to create enough reduction in the slab section that shrinkage cracking preferentially forms below the groove.
What if the cut is too shallow?
If the groove does not weaken the slab enough, the concrete may crack somewhere else before the intended joint activates.
A visible line in the surface is not automatically an effective contraction joint. Depth and timing both matter.
Early-entry saw systems are different from conventional wet or dry saw cuts and can work with shallower details when installed according to the system and project requirements.
6. When Should You Saw-Cut Concrete Control Joints?
The ideal time is as soon as the concrete can be cut without excessive edge damage, but before uncontrolled shrinkage cracks form.
That creates a relatively short timing window.
NRMCA guidance notes that conventional saw cuts are often made roughly 4–12 hours after finishing, while early-entry dry-cut systems can sometimes begin roughly 1–4 hours after finishing. These are planning ranges, not universal deadlines.
Why timing changes from one pour to another
Concrete setting time can change substantially with:
- Concrete temperature
- Air temperature
- Wind
- Sun exposure
- Mixture proportions
- Cementitious materials
- Admixtures
- Slab thickness
If the saw tears aggregate from the edges and leaves badly raveled joints, the concrete may be too soft. If you wait too long, the slab may crack before the saw reaches it.
For the complete placement sequence, see
how to pour a concrete slab step by step.
7. Control Joints vs. Expansion and Isolation Joints
These terms are often used interchangeably in DIY discussions, but they do not describe exactly the same thing.
Contraction or control joint
A contraction joint controls where shrinkage cracking occurs. It is typically tooled, formed, or saw-cut into the slab.
Isolation joint
An isolation joint separates the slab from another element so the two can move more independently.
Common locations include:
- Walls
- Columns
- Footings
- Steps
- Existing slabs
- Other fixed structural elements
A compressible joint material may extend through the full slab depth at these locations.
Construction joint
A construction joint occurs where one concrete placement stops and another begins.
Do not assume a control joint, isolation joint, and construction joint perform the same function. A slab may need more than one joint type.
8. Does Rebar Eliminate the Need for Control Joints?
No. Reinforcement does not make normal concrete shrinkage disappear.
Properly designed reinforcement can help hold cracks tighter and transfer stresses, but ordinary reinforcing steel does not guarantee a crack-free slab.
Joint spacing and reinforcement should be considered together rather than treating one as a substitute for the other.
Heavy reinforcement crossing a contraction joint can also affect how freely that joint opens and how cracking develops, which is why engineered slabs require coordinated reinforcement and joint details.
For residential slab reinforcement options, see
rebar vs. wire mesh vs. fiber for concrete slabs.
9. Common Control Joint Mistakes
Several layout and installation errors repeatedly lead to random cracking.
Spacing joints too far apart
Larger panels create longer distances over which shrinkage must occur. Do not automatically stretch joint spacing to reduce saw cutting.
Making long, narrow panels
A panel with a poor aspect ratio can crack even when its total square footage seems reasonable.
Cutting too shallow
A shallow decorative groove may not create an effective weakened plane.
Sawing too late
Once a random crack has already formed, cutting a joint beside it does not make that crack disappear.
Ignoring inside corners
Reentrant corners are natural stress concentrations and deserve deliberate joint planning.
Expecting control joints to prevent every crack
Good joints reduce uncontrolled cracking; they cannot guarantee that a slab will never develop another crack. Base preparation, concrete mixture, finishing, curing, drainage, thickness, reinforcement, weather, and loading still matter.
10. Control Joints Are Only One Part of Crack Control
A good joint layout cannot compensate for weak soil, poor compaction, excessive water, incorrect finishing, inadequate thickness, or poor curing.
For a durable slab, combine joint planning with:
- Uniform, well-compacted support
- Appropriate slab thickness
- Suitable concrete mixture
- Correct placement and finishing
- Proper reinforcement where required
- Timely contraction joints
- Proper curing
- Good drainage around the slab
The
concrete curing basics guide
explains what happens after finishing and why early moisture and temperature control still matter even when the joint layout is correct.
11. Planning Joints Before the Pour
The best time to decide where joints go is before the concrete truck arrives.
Draw the slab to scale and mark:
- Overall length and width
- Slab thickness
- Inside corners
- Columns or posts
- Steps and walls
- Changes in slab width
- Planned construction joints
- Proposed contraction-joint lines
Then check the panel dimensions against the spacing rule and 1.5:1 maximum aspect ratio.
Once the layout is settled, calculate the pour volume with the
concrete yardage calculator
so the joint plan, slab thickness, and material order all use the same dimensions.
Tools & Next Steps
Calculate slab volume
Enter your length, width, and slab thickness before laying out joints and ordering concrete.
Compare common slab sizes
Use pre-calculated slab dimensions to plan concrete quantity and potential panel layouts.
Frequently Asked Questions
How far apart should control joints be in a 4-inch concrete slab?
About 8–12 feet is the general 24–36-times-thickness range for a 4-inch slab. NRMCA gives approximately 10 feet as an example, and panel shape should also be considered rather than spacing alone.
How far apart should control joints be in a 6-inch slab?
The 24–36-times-thickness rule gives approximately 12–18 feet for a 6-inch slab. However, NRMCA also recommends limiting general joint spacing to about 15 feet, so project requirements should control rather than simply using the largest calculated number.
How deep should control joints be in a 4-inch slab?
A conventional saw-cut joint should generally be at least 1 inch deep in a 4-inch slab. That equals one-quarter of the slab thickness.
When should concrete control joints be cut?
Cut them as soon as the concrete can be sawed without excessive raveling but before random cracking begins. Conventional saw cutting often occurs roughly 4–12 hours after finishing, but weather and concrete setting characteristics can move that window substantially.
Can control joints be too close together?
Yes, unnecessary joints add cutting, maintenance, and potential edge exposure without automatically improving the slab. Joint spacing should be intentionally designed around thickness, geometry, restraints, shrinkage, reinforcement, and use.
Should concrete control joint panels be square?
Yes, square panels are preferred whenever practical. Rectangular panels should generally stay at or below approximately a 1.5:1 length-to-width ratio, and L- or T-shaped panels should be avoided when possible.
Does rebar replace control joints?
No. Rebar can help control crack width but does not eliminate concrete shrinkage. Ordinary reinforced slabs still require appropriate crack-control and joint planning unless they are specifically engineered using a different design approach.
Are control joints the same as expansion joints?
No. A contraction or control joint encourages shrinkage cracking at a planned location, while an isolation or expansion-type joint separates adjoining elements to allow relative movement.
Why did my concrete crack next to a control joint?
The joint may have been too shallow, cut too late, spaced incorrectly, or poorly located—or another source of movement may be involved. Slab geometry, settlement, restraint, curing, temperature, and subgrade conditions can also contribute.
Plan the slab and joint layout before you pour
Disclaimer
This guide provides general planning information for residential concrete slabs-on-ground. Joint spacing and details vary with slab thickness, reinforcement, concrete mixture, shrinkage, soil and base conditions, structural loads, restraints, climate, local requirements, and project design. Structural, post-tensioned, heavily loaded, industrial, foundation, or unusual slabs should use project-specific joint details from a qualified concrete professional or engineer.