
To pour a concrete slab, prepare and compact the base, build level forms, install any required reinforcement, place and screed the concrete, finish the surface, add control joints, and cure the slab properly. Most DIY failures happen before or immediately after the concrete arrives, so preparation and timing matter as much as the pour itself.
The steps below apply to common residential slabs such as patios, shed pads, walkways, and similar flatwork. Structural slabs, garages, driveways, frost-protected foundations, and heavily loaded slabs may need different thickness, reinforcement, subbase, or engineering.
Quick Answer
What are the basic steps for pouring a concrete slab?
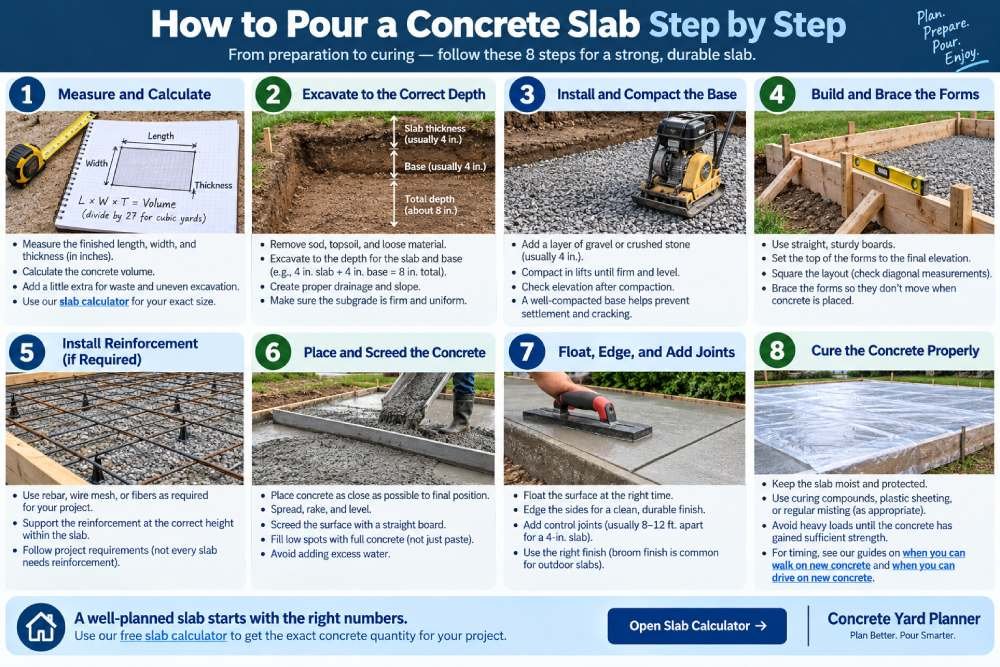
The basic sequence is layout → excavation → compacted base → forms → reinforcement → concrete placement → screeding → finishing → control joints → curing. Do not order concrete until the forms, base, reinforcement, tools, access, and labor are ready.
How thick should a DIY concrete slab be?
Four inches is common for many residential patios, walkways, and light-duty slabs, while driveways, garages, heavier loads, weak soil, or project-specific requirements may justify 5 or 6 inches or a designed section.
Rule of thumb: Finish all excavation, forms, base preparation, reinforcement, and quantity calculations before concrete arrives. Fresh concrete gives you very little time to correct preparation mistakes.
Calculate before you order
Measure the finished slab dimensions and thickness, then add a reasonable allowance for uneven excavation, spillage, and field variation.
Before the concrete truck or mixer starts
- Forms: square, braced, and set to final elevation.
- Base: correct depth, reasonably uniform, and compacted.
- Reinforcement: installed and supported where required.
- Concrete: quantity confirmed with extra margin.
- Tools and crew: screed board, floats, edgers, jointing tools, shovels, curing materials, and enough help ready.
1. Measure the Slab and Calculate the Concrete
Start with the finished length, width, and thickness. Measure the actual slab rather than estimating from the surrounding yard, fence, or building.
For rectangular slabs, concrete volume is:
Length × width × thickness = cubic feet
Convert thickness from inches to feet before multiplying. Then divide cubic feet by 27 to convert to cubic yards.
Example: 12 × 20 ft slab at 4 inches
A 12 × 20-foot slab that is 4 inches thick uses about 80 ft³ of concrete, or approximately 2.96 yd³ before allowing for waste and uneven excavation.
You can check that exact configuration on the 12×20 4-inch slab example. For your own dimensions, use the concrete calculator instead of relying on rounded examples. If the slab has curves, L-shapes, or several sections, the guide on how to measure a concrete slab explains how to divide irregular layouts into simpler shapes. If the slab is a patio, the concrete patio cost and planning guide helps estimate the full installed budget before you begin.
2. Excavate to the Correct Depth
The excavation must provide room for both the concrete slab and the base beneath it. If you want a finished slab at a specific elevation, work backward from the top surface.
For example, a project using a 4-inch slab over 4 inches of compacted base needs roughly 8 inches of total section below the intended top elevation, subject to site conditions and the actual design.
Remove unsuitable material
Do not pour directly over sod, roots, loose topsoil, organic material, mud, or uncompacted fill. These materials can compress or decay and leave unsupported areas beneath the concrete. The guide on how to prepare dirt for a concrete slab explains which ground can remain and what must be removed or replaced.
The subgrade should be firm, reasonably uniform, and properly shaped for the slab. Soft spots should be corrected instead of hidden beneath gravel.
Plan drainage before the slab is placed
Outdoor slabs should not create a bowl that holds water against a house or other structure. Establish the required finished elevation and drainage slope while excavating and setting forms.
3. Install and Compact the Base
A good slab needs uniform support. A granular base can help create a stable working surface, improve drainage in appropriate conditions, and provide a layer that can be graded and compacted accurately.
Do not simply dump loose gravel into the excavation and pour on top. Base material should be placed and compacted properly so it does not settle unevenly after the slab is finished.
The detailed guide to concrete slab base, gravel, compaction, and drainage covers base thickness, compaction, drainage, and common preparation mistakes. For enclosed or interior slabs, review installing a vapor barrier before the pour so ground moisture cannot rise through the finished floor.
Check elevation after compaction
Compaction changes the base thickness. Recheck elevation across the entire slab after compacting so the concrete section does not accidentally become too thin in high spots.
A nominal 4-inch slab should not become a 2½- or 3-inch slab because the base was left too high.
4. Build and Brace the Forms
Forms establish the slab perimeter, finished height, and edge shape. Straight forms should be aligned carefully and supported strongly enough that wet concrete cannot push them outward.
Square the layout
For rectangular slabs, measure both diagonals. When the rectangle is square, the diagonal measurements should match. Correct the layout before adding more stakes and braces.
Set the top of the forms to final elevation
The top edge often serves as the reference for screeding. Check elevations with an appropriate level, laser, or string setup before placement begins.
Brace forms frequently enough that they do not move when concrete is shoveled, raked, vibrated, or screeded against them.
Fix form movement before the pour. Once several thousand pounds of fresh concrete are inside the forms, adjustments become much harder.
5. Install Reinforcement if the Project Requires It
Residential slabs may use rebar, welded wire reinforcement, fibers, or a combination depending on the project. Reinforcement does not guarantee a crack-free slab, but it can help control crack opening, distribute stresses, and provide structural capacity when designed for that purpose.
The rebar vs. wire mesh vs. fiber guide explains the differences between the main reinforcement options.
Do not leave reinforcement on the ground
If reinforcement is intended to be located within the slab, support it at the proper elevation instead of laying it directly on the base and hoping it will be pulled upward while pouring. The guide on how to lay out and support slab rebar covers grid spacing, chairs, and cover.
Improper placement can make reinforcement much less effective than the project design intended.
Confirm slab thickness before reinforcement placement
If you are still choosing between common slab sections, review the 4-inch vs. 6-inch slab comparison before finalizing the forms and quantity.
6. Place and Screed the Concrete
When concrete arrives, work systematically from the far side toward the access point. Place concrete as close as practical to its final position rather than piling it in one location and dragging it long distances.
Do not add unnecessary water
Extra water can make concrete easier to move, but too much water can reduce strength and increase shrinkage. Follow the mix requirements rather than automatically adding water because the concrete feels stiff.
Strike off the surface
Use a straight screed board or appropriate screeding equipment to remove excess concrete and fill low areas. Rest the screed on the forms or other established elevation guides and work across the slab.
The goal is a surface at the correct elevation—not a finished texture yet.
Fill low spots immediately
If screeding exposes a low area, place additional concrete and screed again. Do not simply pull cement paste across deep depressions because those areas need full concrete, including aggregate.
7. Float, Edge, and Finish the Surface
After screeding, floating helps level minor ridges and embed coarse aggregate just beneath the surface. Timing matters. Working the slab too aggressively while bleed water remains can damage the surface.
Wait for bleed water
If water appears on the surface after placement, allow it to evaporate naturally. Do not finish bleed water back into the slab and do not spread dry cement over the surface to absorb it.
Edge exposed slab sides
An edging tool can round exposed edges slightly, helping reduce chipping and giving patios, walkways, and pads a cleaner finished appearance.
Choose the appropriate final texture
A broom finish is common for outdoor walking surfaces because it provides texture. Smooth steel-troweled surfaces may be appropriate for some interior applications but can become slippery outdoors when wet.
Finish only as much as necessary for the desired surface. Excessive finishing can create problems rather than improve the slab.
8. Add Control Joints Before Random Cracks Choose Their Own Path
Concrete shrinks as it dries. Control joints create intentional weakened planes that encourage shrinkage cracks to form in planned locations.
A practical starting point for many 4-inch residential slabs is roughly 8 to 12 feet between joints, with panels kept reasonably square instead of long and narrow. Project conditions can require different spacing.
Joint depth is commonly at least about one-quarter of the slab thickness. For a 4-inch slab, that means roughly 1 inch.
Timing matters
Tooled joints can be formed during finishing. Saw-cut joints should be made once the concrete is hard enough to cut without excessive raveling but before uncontrolled shrinkage cracking develops.
If random cracking has already appeared on a recent pour, the guide to new concrete cracking explains shrinkage, base movement, curing, joint problems, and warning signs.
9. Cure the Concrete Properly
The job is not finished when the surface is hard enough to walk away from. Concrete needs suitable moisture and temperature conditions while cement hydration continues.
Good curing improves strength development and durability and helps reduce excessive early moisture loss.
The concrete curing basics cover common curing methods and the importance of protecting fresh concrete during its early life. If you are working in low temperatures, a cold-weather concrete pour needs extra freeze protection and longer curing.
Do not load the slab too early
How soon a slab can be walked on, built on, or driven over depends on the concrete, weather, slab design, and load.
For pedestrian use, see the guide on when you can walk on new concrete.
For vehicle loads, use the separate guide on when you can drive on new concrete.
10. Common DIY Slab Pouring Mistakes
| Mistake | Why It Causes Problems |
|---|---|
| Pouring over loose soil | Can lead to settlement and unsupported areas |
| Weakly braced forms | Forms can move and change slab dimensions or elevation |
| Ordering too little concrete | Can create delays, cold joints, or thin slab areas |
| Adding excessive water | Can increase shrinkage and reduce strength |
| Finishing bleed water into the surface | Can create a weak surface layer |
| Missing or late control joints | Allows random cracking to develop |
| Poor curing | Can reduce durability and increase early moisture-loss problems |
Before starting, review the common concrete slab mistakes for a more detailed pre-pour checklist.
Tools & Next Steps
Calculate your slab
Enter length, width, and thickness to estimate concrete volume before ordering material.
Compare common slab dimensions
Browse pre-calculated slab sizes and concrete quantities for common residential projects.
Frequently Asked Questions
Can I pour a concrete slab myself?
Yes, small nonstructural slabs can be realistic DIY projects for experienced homeowners with adequate preparation and help. Larger slabs become difficult quickly because placement, screeding, finishing, and jointing must happen within a limited working window.
How thick should a concrete slab be?
Four inches is common for many patios, walkways, and light-duty residential slabs. Driveways, garages, heavy equipment, weak soil, and structural applications may require thicker concrete or a designed slab section.
Do you need gravel under a concrete slab?
Many slabs use a compacted granular base, but the required base depends on soil, drainage, loads, climate, and project design. Gravel does not compensate for soft subgrade or poor compaction.
Can you pour concrete directly on dirt?
Concrete should not simply be poured over loose topsoil, sod, mud, organic material, or unstable fill. The subgrade must provide uniform support, and many projects benefit from a properly prepared granular base.
Do I need rebar in a concrete slab?
Not every slab uses the same reinforcement system. Rebar, welded wire reinforcement, fibers, or combinations may be specified depending on loads, slab dimensions, cracking control, soil, and project requirements.
How long should concrete cure before using the slab?
Concrete begins hardening quickly but continues developing strength over time. The safe time for walking, construction loads, vehicles, or other use depends on the mix, temperature, curing, slab design, and load.
How far apart should control joints be in a concrete slab?
For many 4-inch residential slabs, roughly 8 to 12 feet is a useful starting range. Keep panels reasonably square and adjust spacing for slab thickness, geometry, reinforcement, mix, exposure, and project requirements.
Should you wet the ground before pouring concrete?
The base should not be muddy, saturated, or holding standing water. In some hot and dry conditions, a very dry absorptive base may be conditioned before placement, but the correct approach depends on the base material and job conditions.
How much extra concrete should I order?
Order enough to cover the calculated volume plus a reasonable allowance for excavation variation, spillage, and field conditions. The appropriate margin depends on slab size, excavation accuracy, ordering method, and the consequences of running short.
Calculate the slab before the pour begins
Disclaimer
This guide provides general information for residential DIY concrete planning. Slab thickness, reinforcement, base preparation, drainage, frost protection, joint layout, concrete specification, curing, and structural requirements vary by project and location. Verify local building requirements and project specifications before pouring, and consult a qualified contractor or engineer for structural slabs, foundations, garages, heavily loaded slabs, retaining structures, poor soils, or conditions where failure could affect people or property.