
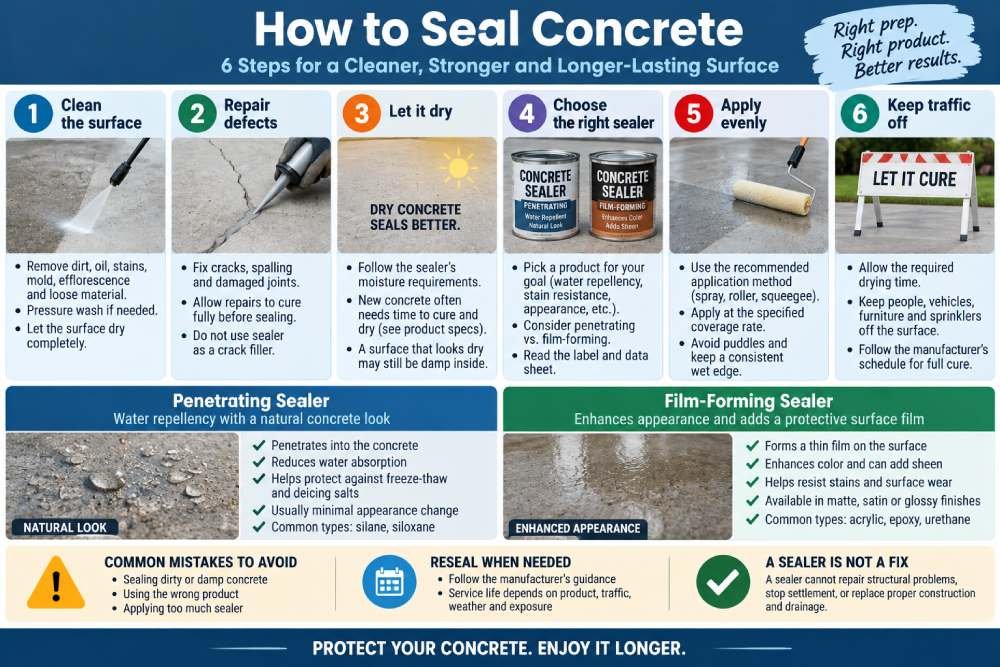
To seal concrete correctly, clean and prepare the surface, repair defects, let the concrete reach the moisture condition required by the product, choose the right type of sealer, and apply it evenly at the manufacturer’s recommended coverage rate. The biggest mistakes are sealing dirty or damp concrete, choosing the wrong product, and applying too much sealer.
A good concrete sealer can help reduce water penetration, staining, weather exposure, and surface contamination, but sealer cannot fix settlement, structural cracking, poor drainage, or a failing slab underneath. Preparation and product selection matter more than simply rolling a clear liquid over the surface.
Quick Answer
What is the best way to seal concrete?
Start with clean, sound concrete and select a sealer designed for the surface and your goal. Penetrating sealers are often used when you want water repellency with little appearance change, while film-forming sealers are used when gloss, color enhancement, or a protective surface film is desired.
Should concrete be completely dry before sealing?
Follow the specific sealer’s moisture requirements. Many sealers perform best on visibly dry concrete, and excessive moisture can reduce penetration or cause film-forming products to turn cloudy, whiten, bubble, or lose adhesion.
How many coats of concrete sealer do you need?
Use the number of coats and coverage rate specified by the manufacturer. Some penetrating products use one saturating application, while other sealers require two thin coats. More material is not automatically better.
Do not seal over a problem
If the slab is cracking, settling, holding water, flaking, or showing moisture problems, identify the cause before hiding the surface beneath a sealer.
Concrete sealing checklist
- Choose the goal: water repellency, stain resistance, appearance enhancement, or surface protection.
- Clean thoroughly: remove dirt, oil, coatings, curing residue, efflorescence, and loose material as required.
- Repair first: address cracks, failed joints, spalling, and drainage problems.
- Check moisture: the slab must meet the selected product’s requirements.
- Watch the weather: avoid rain, extreme surface temperatures, and unsuitable humidity.
- Apply evenly: follow the specified coverage rate and never leave unnecessary puddles.
1. Decide Why You Want to Seal the Concrete
There is no single “best concrete sealer” for every project. The right product depends on what you want the sealer to do.
Common goals include:
- Reducing liquid-water penetration
- Reducing exposure to deicing salts
- Making stains easier to clean
- Enhancing decorative concrete color
- Creating a matte, satin, or glossy appearance
- Reducing dusting or surface wear with a compatible treatment
Start with the performance goal, not the marketing label on the container.
For example, an exterior driveway where you want the concrete to remain natural-looking has different requirements from stamped concrete where you want a darker, glossy “wet look.”
2. Choose the Right Type of Concrete Sealer
Concrete sealers can be divided broadly into penetrating treatments and film-forming sealers or coatings.
| Type | How It Works | Typical Use | Appearance |
|---|---|---|---|
| Silane / siloxane | Penetrates concrete and reduces liquid-water absorption | Exterior driveways, patios, walks and masonry | Usually little visible change |
| Acrylic sealer | Forms a thin film at the surface | Decorative concrete, stamped patios, exterior slabs | Can range from low sheen to glossy |
| Epoxy / urethane system | Creates a more substantial protective coating | Interior floors, garages and specialty applications | Film-forming; finish varies |
| Silicate densifier | Reacts within the concrete to harden and densify the surface | Polished or hard-troweled floors | Usually minimal change by itself |
A densifier and a water-repellent sealer are not automatically the same thing. A lithium or sodium silicate treatment may increase surface hardness without providing the same water repellency as a silane or siloxane treatment.
Penetrating sealer
A penetrating product works below the visible surface and is often a good fit when you want to maintain a natural concrete appearance.
These products are common on exterior concrete exposed to rain, freeze-thaw conditions, and deicing chemicals.
Film-forming sealer
Acrylic and other film-forming products leave a visible membrane at the surface. They can enhance color and produce a sheen or glossy appearance.
Film-forming sealers are more sensitive to overapplication, trapped moisture, and surface preparation.
3. Make Sure the Concrete Is Ready to Be Sealed
Do not assume concrete is ready simply because the surface feels hard.
New concrete goes through several overlapping processes: setting, curing, strength gain, and drying.
The
concrete drying vs. curing guide
explains why a slab can be strong enough for use while still containing substantial moisture.
Sealing requirements depend on the product. Many ordinary post-cure sealers call for mature, dry concrete and may specify approximately 28 days after placement. However, dedicated cure-and-seal products are specifically formulated to be applied to fresh concrete while also functioning as curing compounds.
Always use the product data sheet instead of assuming that every sealer follows the same waiting period.
We will cover this timing question in more detail in the separate guide on when to seal new concrete.
4. Clean the Concrete Thoroughly
A sealer can only bond to or penetrate the concrete it can actually reach.
Remove contaminants such as:
- Dirt and dust
- Oil and grease
- Tire residue
- Mold or organic growth
- Efflorescence
- Loose concrete
- Old incompatible coatings
- Curing compounds when incompatible with the new product
The correct cleaning method depends on the contaminant and the sealer being applied. Pressure washing may be useful outdoors, while mechanical preparation may be required when an existing coating or dense surface prevents adhesion or penetration.
Do not seal over oil and expect the sealer to glue it permanently into the slab.
Let washed concrete dry
If you pressure wash or wet-clean the slab, allow enough time for the concrete to reach the moisture condition required by the sealer.
A surface that looks dry after an hour can still contain significant moisture below the surface.
5. Repair Cracks and Defects Before Sealing
Concrete sealer is not crack filler.
Penetrating sealers will not repair an open crack, and a thin acrylic film should not be expected to bridge significant movement.
Before sealing, inspect for:
- Random cracks
- Failed crack repairs
- Open joints
- Spalling
- Scaling
- Settlement
- Drainage problems
If repair is needed, use the
concrete crack repair guide
before applying the sealer.
If the cracking pattern is unexplained, first review
why concrete cracks.
Do not rigidly fill movement joints
Control and isolation joints serve specific movement functions. Treat them with compatible joint materials where required rather than filling every groove with a rigid product.
The
concrete control joint guide
explains why these intentional joints are different from random cracks.
6. Check the Weather Before Sealing Exterior Concrete
Weather can make the difference between a clean, even application and a cloudy or peeling one.
Check the product data sheet for:
- Minimum air temperature
- Maximum air temperature
- Surface temperature
- Humidity limits
- Rain-free period
- Required drying time before traffic
As one example, current penetrating-sealer guidance from PROSOCO lists a preferred application range of roughly 40°F to 95°F for one of its concrete sealers. That should not be treated as a universal temperature range for every product.
The manufacturer’s limits always override a generic rule of thumb.
Avoid hot concrete in direct sun
Hot slabs can cause solvents or water to evaporate too quickly, resulting in uneven penetration, roller marks, bubbles, or poor film formation.
For many exterior applications, a cooler part of the day is easier to work with than a slab that has been baking in direct afternoon sun.
7. Test the Sealer in a Small Area First
Always test an inconspicuous area before coating the entire slab.
A test area can reveal:
- Unexpected darkening
- Gloss level
- Color enhancement
- Absorption rate
- Compatibility with old sealer
- Surface slipperiness
- Streaking or whitening
This is particularly important on stamped, stained, exposed-aggregate, previously sealed, or highly polished concrete.
8. How to Apply Concrete Sealer Step by Step
Step 1: Measure the area
Calculate the square footage:
Length × width = square feet
A 12 × 20-foot patio has:
12 × 20 = 240 ft²
Compare that area with the manufacturer’s published coverage rate to determine how much product you need.
Step 2: Protect surrounding surfaces
Mask or cover walls, siding, garage doors, glass, plants, painted surfaces, pavers, and other materials that should not receive overspray or drips.
Read the SDS and product instructions for required gloves, eye protection, ventilation, respirators, ignition control, and other precautions.
Step 3: Mix or prepare the product
Some sealers are ready to use. Others have specific mixing requirements.
Do not dilute, combine, or modify the product unless the manufacturer’s instructions specifically allow it.
Step 4: Apply an even coat
Depending on the product, application may use a low-pressure sprayer, roller, squeegee, brush, or combination of methods.
Maintain an even wet edge and distribute material consistently.
On film-forming acrylic sealers, spraying followed by appropriate back-rolling may help distribute the material and reduce lap marks when recommended by the manufacturer.
Step 5: Eliminate puddles
Do not leave excess sealer pooled in joints, depressions, or low spots.
Penetrating products generally need to soak into the concrete rather than dry as heavy puddles on top. Film-forming products also need the correct film thickness.
Step 6: Apply a second coat only if specified
Some products require one application. Others use two thin coats.
If a second coat is required, follow the manufacturer’s recoat window and application direction.
9. Do Not Apply Too Much Concrete Sealer
This is one of the most common DIY mistakes.
More sealer does not mean more protection.
Applying a film-forming product too heavily can contribute to:
- Whitening or cloudiness
- Bubbling
- Peeling
- Slow drying
- Roller marks
- Uneven gloss
- Trapped moisture
Euclid Chemical specifically warns that heavy coats and excessive buildup can trap moisture and eventually contribute to white appearance, loss of adhesion, peeling, or flaking.
Measure your slab and follow the published square-feet-per-gallon coverage rate.
10. How Long Should Concrete Sealer Dry Before Use?
There is no single traffic-opening time for every concrete sealer.
The product may have separate times for:
- Dry-to-touch
- Second coat
- Foot traffic
- Vehicle traffic
- Full chemical resistance
Some acrylic sealers may allow light use within about a day under favorable conditions, but you should use the actual manufacturer’s cure and traffic schedule.
Temperature, humidity, coating thickness, airflow, and product chemistry can all change the drying time.
Keep sprinklers, rain, furniture, vehicles, and foot traffic off the slab for the required period.
11. Can Sealed Concrete Become Slippery?
Yes, some film-forming sealers can reduce traction, especially when the surface is wet.
This deserves extra attention around:
- Pool decks
- Patios
- Exterior steps
- Sloped driveways
- Garage entrances
Some systems allow an approved slip-resistant additive to be incorporated into the final coat.
Do not improvise with random aggregate or sand unless the product manufacturer approves the method. The particle type, size, loading, and coating thickness affect both appearance and traction.
12. Sealing a Driveway vs. Patio vs. Garage Floor
Concrete driveway
For many exterior driveways, the priority is water and salt resistance without creating a glossy traffic film. A penetrating water repellent is therefore a common option.
Concrete patio
A plain patio may use a penetrating sealer, while stamped or colored concrete is often sealed with an acrylic product designed to enhance appearance.
Consider slip resistance carefully on outdoor entertainment areas.
Garage floor
Garage floors may need resistance to tires, oil, abrasion, chemicals, and hot-tire exposure. A simple exterior acrylic sealer may not provide the same performance as an appropriately prepared epoxy, polyaspartic, or urethane flooring system.
Select the product for the exposure, not just for the word “concrete” on the label.
13. What If the Concrete Was Previously Sealed?
Applying a new sealer over an unknown old coating can cause compatibility problems.
Before recoating, determine:
- What type of sealer is already present
- Whether it is still bonded
- Whether the new product is compatible
- Whether stripping or mechanical preparation is required
Do not simply keep adding coats year after year. Excess film buildup can trap moisture, become cloudy, peel, or create an excessively glossy and slippery surface.
If you cannot identify the previous product, perform a small compatibility test or consult the new sealer manufacturer before coating the entire slab.
14. How Often Should Concrete Be Resealed?
Resealing should be based on product performance and surface condition, not an arbitrary annual schedule.
Service life varies with:
- Sealer chemistry
- UV exposure
- Vehicle traffic
- Freeze-thaw cycles
- Deicing chemicals
- Abrasion
- Cleaning methods
- Original preparation and application
Acrylic surface films may need maintenance sooner than some penetrating treatments, but the actual reapplication interval should come from the product manufacturer and observed performance.
Signs that a surface may need evaluation include loss of water repellency, uneven appearance, worn traffic areas, or deterioration of the existing film.
15. Sealing Does Not Replace Good Concrete Construction
Sealer is the final protective layer—not a substitute for good concrete underneath.
A durable slab still depends on:
- Proper slab thickness
- Stable, compacted subgrade
- Good drainage
- Correct concrete mixture
- Properly planned control joints
- Appropriate reinforcement where required
- Proper finishing
- Proper curing
Review the
concrete curing best practices
before sealing newly placed concrete.
If you are still planning the slab itself, calculate concrete volume with the
concrete calculator
before ordering material.
You can also compare common residential dimensions in the
concrete slab project hub.
Tools & Next Steps
Still planning the slab?
Calculate length, width, thickness, and concrete volume before placement and curing.
Working with new concrete?
Understand curing first so you do not seal at the wrong stage of the slab’s development.
Frequently Asked Questions
Is sealing concrete worth it?
It can be, when the sealer addresses a real exposure or maintenance need. Appropriate products can reduce water penetration, staining, salt exposure, or surface contamination, while decorative sealers can also enhance appearance.
Should I pressure wash concrete before sealing?
Pressure washing can be useful for exterior preparation, but the concrete must still be properly cleaned and allowed to dry as required by the sealer. Oil, old coatings, curing compounds, and some stains may need additional treatment.
Does concrete need to be dry before sealing?
Many sealers perform best on dry concrete, but exact moisture requirements depend on the product. Excessive moisture can reduce penetration or cause film-forming products to whiten, bubble, or lose adhesion.
How many coats of concrete sealer should I apply?
Apply only the number of coats specified by the manufacturer. Depending on the chemistry and surface, that may be one saturating application or two thinner coats. Overapplication can cause performance problems.
Should I roll or spray concrete sealer?
Use the method specified for the product. Some penetrating sealers are best applied with low-pressure spray equipment, while acrylic products may use spraying, rolling, or spraying followed by back-rolling.
Can I seal concrete cracks?
A concrete surface sealer is not a substitute for crack repair. Repair significant cracks and determine whether they are stable or moving before sealing the surrounding slab.
Why did my concrete sealer turn white?
Whitening can result from trapped moisture, overapplication, poor adhesion, unsuitable temperature or humidity, or incorrect film formation. The cause and repair depend on the sealer chemistry.
Can you put new sealer over old concrete sealer?
Only when the new product is compatible with the existing sealer and the old film is properly prepared. Unknown, peeling, or heavily built-up coatings may need removal first.
Does concrete sealer stop all water?
No. Sealers can reduce water penetration but should not be treated as a repair for open cracks, failed joints, hydrostatic pressure, bad drainage, or below-grade waterproofing problems.
How long after sealing concrete can it get wet?
Follow the manufacturer’s required rain-free and cure period. The correct time varies by chemistry, temperature, humidity, film thickness, and application conditions.
Clean it. Repair it. Let it dry. Then seal it correctly.
Disclaimer
This guide provides general DIY information for sealing residential concrete. Concrete sealers and coatings vary widely in chemistry, moisture tolerance, temperature limits, application rate, VOC content, ventilation requirements, slip resistance, curing time, and surface preparation. Always follow the current product label, technical data sheet, and safety data sheet. Structural cracks, hydrostatic moisture, severe deterioration, unknown existing coatings, or unusual commercial and industrial applications should be evaluated by a qualified concrete professional.