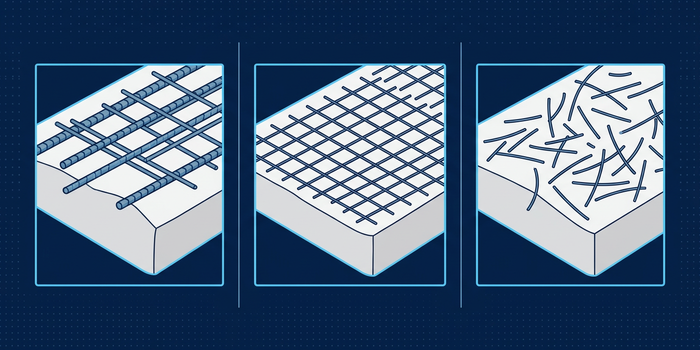
Cracking is the most common concrete slab problem, and the question of reinforcement—rebar, wire mesh, or fiber—comes up on every project. The confusion is understandable: different sources recommend different solutions, costs vary significantly, and the consequences of choosing wrong aren’t always clear until months after your pour when cracks appear.
Here’s the reality: reinforcement doesn’t prevent cracks, and no amount of steel or fiber compensates for poor base preparation or missing control joints. What reinforcement does—when chosen correctly and placed properly—is control how cracks behave, add load-carrying capacity in specific situations, and provide a safety margin against certain types of failure. This guide explains what each reinforcement option actually does, when it helps, and the common placement mistakes that waste money and provide no benefit.
Quick Answer
Best for Crack Control (Most DIY Slabs)
Welded wire mesh is often the best balance of crack control, ease of installation, and cost for typical residential slabs. It helps hold cracks together if they form, distributes stress across a wider area, and works well for patios, walkways, and light-duty applications. The key is proper placement—mesh must be supported in the middle third of the slab thickness, not sitting on the base where it provides no benefit.
Best for Heavier Loads / Structural Support
Rebar provides superior load-carrying capacity and is the right choice for driveways, garage floors, and slabs supporting significant weight. It resists bending stress more effectively than mesh, allows precise placement in high-stress areas like edges and joints, and creates a structurally reinforced slab rather than just crack control. Rebar requires more labor to install correctly but delivers performance mesh cannot match for demanding applications.
Best “Add-On” Option (When You Want Simpler Setup)
Fiber reinforcement mixes directly into concrete and requires no placement labor or supports. Synthetic fibers reduce plastic shrinkage cracking during curing and provide some impact resistance, making them ideal as a supplement to other reinforcement or for small projects where simplicity matters. Fiber doesn’t replace rebar or mesh for structural reinforcement but adds a layer of protection against early-age cracking with minimal extra effort.
Rule of thumb: Use rebar for heavy loads and structural applications. Use welded wire mesh for general crack control on lighter slabs. Add fiber to either when you want extra protection against surface cracking. Always combine any reinforcement with proper base preparation and control joints—reinforcement alone doesn’t prevent problems.
Browse Pre-Calculated Slab Sizes
See ready-made concrete estimates for common slab dimensions—no measuring required.
Quick Decision Guide
- If you have a patio, walkway, or light slab: Choose welded wire mesh or fiber for simple crack control.
- If you have a driveway or garage with vehicle loads: Choose #3 or #4 rebar for structural capacity.
- If you want maximum protection: Combine rebar (structure) + fiber (plastic shrinkage) for comprehensive reinforcement.
What Reinforcement Really Does (and What It Doesn’t)
Concrete Cracks—Your Goal Is “Control”
All concrete cracks to some degree, and no reinforcement prevents cracking entirely. Concrete shrinks as it cures, expands and contracts with temperature changes, and has relatively low tensile strength compared to its compressive strength. These fundamental properties mean cracks will form regardless of reinforcement.
What reinforcement does is control crack behavior once cracks start. Unreinforced concrete that cracks can separate completely, with crack edges pulling apart and creating trip hazards or structural weakness. Properly reinforced concrete holds crack edges together, limiting crack width and maintaining load transfer across the crack.
Think of reinforcement as damage control rather than damage prevention. It doesn’t stop cracks from forming, but it keeps them tight, prevents them from widening dramatically, and maintains slab integrity even after cracking occurs. This distinction matters because many DIYers expect reinforcement to eliminate cracks entirely and are disappointed when cracks appear despite using rebar or mesh.
The most effective crack prevention comes from proper base preparation, appropriate concrete mix design, correct curing practices, and well-planned control joints. Reinforcement works with these fundamentals, not instead of them.
Crack Control vs Load Capacity (Key Difference)
Reinforcement serves two distinct purposes: controlling shrinkage cracks and increasing load-carrying capacity. These are related but different functions that require different reinforcement approaches.
Crack control reinforcement—typically light wire mesh or fiber—provides tensile strength that concrete lacks. When concrete wants to crack from shrinkage or thermal movement, the reinforcement bridges across the potential crack and holds it tight. This doesn’t prevent the crack from forming but keeps it from opening wide.
Structural reinforcement—typically rebar in planned locations—increases the slab’s ability to carry loads and resist bending stress. When heavy vehicles drive over a slab or concentrated loads bear down, structural reinforcement prevents the concrete from breaking under tension on the bottom face. This is genuine load capacity enhancement, not just crack control.
Light residential slabs primarily need crack control. Heavy-duty slabs need both crack control and structural capacity. Choosing the right reinforcement type depends on which function matters more for your specific project. A patio needs crack control. A driveway for heavy trucks needs structural reinforcement plus crack control.
Understanding this distinction helps you avoid over-engineering light projects or under-engineering heavy ones.
The Role of Joints and Base (Reinforcement Doesn’t Replace Base/Joints)
Reinforcement cannot compensate for inadequate base preparation or missing control joints. This bears repeating because it’s the most common misconception in residential concrete work. Builders sometimes assume that adding rebar or mesh allows them to skip base compaction, use thinner gravel layers, or eliminate control joints.
In reality, reinforcement works only when the slab has proper support from below and planned crack locations through joints. A reinforced slab on poorly compacted base will crack from settlement just as badly as unreinforced concrete—the reinforcement may hold the crack edges together, but it won’t prevent the movement that causes cracking.
Similarly, reinforcement doesn’t eliminate the need for control joints. Joints provide planned weak points where cracks form in straight lines rather than random patterns. Reinforcement works with joints by controlling crack width and preventing secondary cracks between joints. It doesn’t replace the joints themselves.
The correct hierarchy is: proper base first, appropriate slab thickness for loads second, control joints planned and executed third, and reinforcement added fourth as enhancement and insurance. Reversing this order or skipping steps leads to problems no amount of reinforcement can fix.
Budget and effort should prioritize base quality and jointing before investing heavily in reinforcement upgrades.
Option 1 — Rebar
What Rebar Is Best At
Rebar excels at providing structural reinforcement that increases load-carrying capacity and resists bending stress. Steel rebar has high tensile strength and stiffness that concrete lacks. When embedded in concrete and properly placed, rebar creates a composite material that resists both compression (concrete’s strength) and tension (steel’s strength).
This makes rebar the best choice for slabs that will carry heavy loads, experience significant bending forces, or need genuine structural capacity beyond simple crack control. Garage floors supporting vehicles, driveways for heavy trucks, and slabs with thickened edges all benefit from rebar’s structural contribution.
Rebar also allows precise placement in specific high-stress locations. You can concentrate reinforcement at slab edges, around openings, at joints, and in areas where you expect maximum stress. This targeted approach provides reinforcement exactly where it matters most rather than uniformly across the entire slab.
The common sizes for residential slab work are number 3 and number 4 rebar, which refer to bar diameter in eighths of an inch. Number 3 rebar is three-eighths inch diameter, number 4 is one-half inch. Larger bars provide more strength but cost more and require more concrete cover.
Pros / Cons
Advantages of rebar:
- Superior structural capacity: Rebar provides genuine load-carrying enhancement that mesh and fiber cannot match. For heavy-duty applications, it’s the only option that delivers adequate strength.
- Precise placement control: You can position rebar exactly where needed—at edges, in specific grid patterns, concentrated in high-stress zones. This targeted approach maximizes effectiveness.
- Proven long-term performance: Rebar has decades of track record in commercial and residential applications. When properly placed with adequate cover, it performs reliably for the life of the concrete.
- Better crack control than mesh in thick slabs: In slabs six inches or thicker, properly sized rebar controls cracks more effectively than light wire mesh.
Disadvantages of rebar:
- Higher labor requirement: Rebar must be cut to length, positioned in a grid pattern, tied together at intersections, and supported at proper height. This takes significantly more time than rolling out mesh.
- Requires chairs or supports: Keeping rebar at the correct height during concrete placement requires substantial support—plastic or metal chairs every few feet. Without them, rebar sinks to the bottom and provides no benefit.
- More expensive than mesh: Both material cost and installation labor are higher for rebar compared to welded wire mesh, though the difference narrows on larger projects where rebar’s structural benefits justify the cost.
- Rust concerns if exposed: Rebar needs adequate concrete cover to prevent rust. If concrete is too thin or rebar is placed too close to the surface, rust can eventually cause spalling and deterioration.
Best Use Cases (Driveways, Garages, Heavy Loads, Thickened Edges)
Rebar is the appropriate choice for applications where loads exceed what simple crack control can handle. Residential driveways carrying regular vehicle traffic benefit from rebar, particularly if larger vehicles like RVs or work trucks will use the driveway. The repeated loading and concentrated wheel loads create bending stress that rebar resists.
Garage floors experience similar loading—parked vehicles concentrate significant weight in small areas, turning creates stress, and dropped tools or equipment can create impact loads. Rebar provides the structural capacity that makes garage floors durable under these conditions.
Slabs with thickened edges—where the perimeter is poured thicker than the center to support walls or prevent edge failure—typically need rebar in the thickened portion. The edge acts as a small beam supporting loads, and rebar provides the tensile reinforcement beams require.
Commercial or industrial slabs, even at residential properties, should use rebar. Shop floors, equipment pads, and areas where heavy machinery operates need the structural capacity only rebar provides. In these applications, mesh and fiber are supplementary at best.
If you’re unsure whether your project needs rebar’s structural capacity, consult with your concrete supplier or a local contractor experienced with similar applications in your area.
DIY Pitfalls (Wrong Spacing, Wrong Support, Sitting on Base)
The most common rebar mistake is inadequate support that allows bars to sink during concrete placement. Rebar sitting on the base provides almost no benefit—it must be in the lower third to middle of the slab thickness to resist tensile stress on the bottom face when the slab bends under load.
Proper support requires chairs or dobies every three to four feet along each bar, with additional support at intersections and anywhere the rebar grid might shift during pouring. Skimping on supports to save a few dollars wastes the entire investment in rebar if bars end up at the bottom of the slab.
Another frequent error is incorrect spacing. Rebar spaced too far apart doesn’t adequately control cracks or provide uniform reinforcement. Spacing too close wastes money and can create concrete placement difficulties if bars obstruct flow. Common residential spacing is twelve to eighteen inches on center in both directions, forming a grid pattern.
Failing to tie intersections is another mistake. Bars must be wired together where they cross to maintain grid integrity during concrete placement. Loose bars shift position as concrete flows around them, ending up misaligned and less effective.
Finally, many DIYers place rebar too close to the surface, either through measurement errors or inadequate chair height. Rebar needs at least two inches of concrete cover below and above to prevent rust and maintain structural effectiveness. Less cover eventually leads to rust, spalling, and deterioration.
If you’re using rebar, invest in proper supports and take time to position and tie everything correctly before concrete arrives—there’s no fixing placement errors after the pour starts.
Option 2 — Welded Wire Mesh (WWM)
What Mesh Is Best At (Shrinkage Crack Control)
Welded wire mesh excels at controlling shrinkage cracks in light to moderate-duty slabs. The mesh consists of a grid of steel wires welded at intersections, creating a mat that distributes tensile stress across the slab. When concrete shrinks during curing or experiences minor movement, the mesh holds potential cracks tight and prevents them from widening.
Mesh works particularly well for applications where structural load capacity isn’t the primary concern but crack control matters. Patios, walkways, basement floors, and similar slabs benefit from mesh’s ability to hold everything together without the cost and labor of rebar installation.
The even distribution of steel throughout the slab provides uniform crack control rather than concentrated reinforcement in specific areas. This makes mesh ideal for slabs where stress is relatively uniform and you want consistent performance across the entire surface.
Common mesh sizes are identified by wire spacing and gauge. 6×6 10/10 mesh means six-inch spacing in both directions with 10-gauge wire. This is the most common residential mesh specification. Lighter mesh like 6×6 12/12 uses thinner wire and provides less reinforcement. Heavier mesh with closer spacing or thicker wire provides more crack control but costs more.
Pros / Cons
Advantages of welded wire mesh:
- Easier installation than rebar: Mesh comes in rolls or sheets that simply unroll across the base. No cutting individual pieces or tying intersections—the welded grid is already assembled.
- Good crack control for light slabs: Mesh effectively controls shrinkage cracking in slabs that don’t carry heavy loads. For typical residential patios and walkways, it provides adequate reinforcement at reasonable cost.
- Lower cost than rebar: Both material and labor costs are less than rebar installation, making mesh the economical choice when structural capacity isn’t required.
- Uniform distribution: The regular grid pattern provides consistent reinforcement across the entire slab rather than requiring careful planning of bar placement.
Disadvantages of welded wire mesh:
- Less structural capacity than rebar: Mesh doesn’t provide the load-carrying capacity of properly sized rebar. It controls cracks but doesn’t significantly increase the slab’s ability to support heavy loads.
- Frequently ends up at the bottom: Mesh is thin and flexible, making it difficult to support properly. Without careful attention, workers stepping on mesh or concrete flow during placement pushes it to the bottom where it’s ineffective.
- Difficult to support at correct height: The thinness that makes mesh easy to handle also makes it hard to keep elevated during placement. It requires chairs specifically designed for mesh or careful use of small concrete “cookies” to maintain position.
- Sharp cut edges are hazards: When mesh is cut to fit around obstacles or at slab edges, the cut wires create sharp points that can injure workers and puncture boots or gloves.
Best Use Cases (Patios, Sidewalks, Light Slabs)
Welded wire mesh is ideal for residential slabs that primarily need crack control rather than structural reinforcement. Backyard patios carrying furniture and foot traffic don’t require rebar’s capacity but benefit from mesh holding potential cracks together. The crack control keeps the surface even and prevents tripping hazards from separated concrete sections.
Sidewalks and walkways connecting different areas of your property are excellent mesh applications. These typically see only foot traffic and occasionally light equipment like lawnmowers or wheelbarrows. Mesh provides adequate reinforcement for these loads while keeping installation simple.
Basement floors and interior slabs inside buildings work well with mesh. These surfaces rarely experience the heavy concentrated loads that require rebar, but they benefit from crack control that maintains floor flatness and prevents separations at cracks.
Some residential driveways use mesh, particularly those that only see passenger vehicles and won’t carry heavier trucks or equipment. This is a judgment call based on expected loads—conservative builders prefer rebar even for light driveways, while others successfully use mesh for driveways that see only regular car traffic.
If your project involves any regular heavy vehicle traffic, frequent concentrated loads, or structural requirements beyond simple crack control, upgrade to rebar rather than relying on mesh.
DIY Pitfalls (“Ends Up at the Bottom”, Overlaps, Cut Edges)
The biggest mesh failure is improper placement that leaves it at the bottom of the slab instead of in the middle third where it’s effective. Mesh must be elevated above the base before concrete is poured, then maintained at that height throughout placement. This requires supports—either purpose-made mesh chairs or small pieces of concrete placed under the mesh to hold it up.
Many DIYers place mesh directly on the base, planning to “pull it up” as concrete is poured. This rarely works well. Once concrete covers the mesh, pulling it up is difficult and often incomplete. Workers sometimes step on mesh during finishing, pushing it back down. The result is mesh at or near the bottom of the slab providing minimal benefit.
Another common error is inadequate overlap where mesh sections meet. Overlaps should be at least six inches, with both directions of wire overlapping. Short overlaps or overlaps in only one direction create discontinuities in the reinforcement where cracks can widen.
Cut edges create safety hazards and sometimes catch on tools or boots during placement, pulling mesh out of position. File sharp points, bend cut wires away from traffic areas, and warn anyone working on the slab about sharp edges. Some contractors tape cut edges or cap them with plastic sleeves.
Finally, mesh near slab edges needs particular attention. The edge is a high-stress area where crack control matters most, but it’s also where maintaining mesh position is most difficult. Make sure mesh extends close to form edges and remains elevated during placement.
If you use mesh, prioritize elevation supports and verify position before, during, and after concrete placement—this single factor determines whether mesh provides any benefit.
Option 3 — Fiber (Synthetic / Micro / Macro)
What Fiber Is Best At (Plastic Shrinkage + Surface Crack Reduction)
Fiber reinforcement excels at reducing plastic shrinkage cracks that form during the first hours after concrete placement. These early cracks occur as concrete loses moisture faster than it can be replaced from below, creating surface tension that causes hairline cracking. Synthetic fibers distributed throughout the mix provide micro-reinforcement that resists this early-age cracking.
Fibers also improve impact resistance and reduce surface spalling—the shallow chips and breaks that occur when something strikes the concrete surface. For floors subject to dropped tools, rolled equipment, or similar impacts, fiber provides modest protection against surface damage.
There are different fiber types suited to different purposes. Micro-synthetic fibers are fine plastic fibers primarily for plastic shrinkage control and reducing surface cracking. Macro-synthetic fibers are larger structural fibers that provide some post-crack load capacity—they help hold concrete together after cracks form. Steel fibers, less common in residential work, provide more significant structural enhancement but cost substantially more.
Fiber’s key advantage is simplicity. It mixes into the concrete at the batch plant or in the truck, requiring no placement labor, supports, or position verification. Every cubic yard of concrete gets the same fiber content automatically. This makes fiber the easiest reinforcement option to specify and the hardest to mess up during installation.
Pros / Cons
Advantages of fiber reinforcement:
- No placement labor: Fiber is mixed into concrete before delivery. No positioning, supporting, tying, or placement verification required. This eliminates the most common reinforcement mistakes.
- Reduces early-age cracking: Fiber effectively controls plastic shrinkage cracks during the critical first hours of curing when concrete is most vulnerable to surface cracking.
- Improves impact resistance: Distributed fiber provides modest protection against surface damage from dropped objects and impact loading.
- Works as supplement to other reinforcement: Fiber complements rebar or mesh by addressing different crack types. You can use fiber plus rebar for comprehensive reinforcement.
- Minimal cost increase: Fiber typically adds a modest per-cubic-yard charge to concrete cost—often less than the labor cost of installing mesh or rebar.
Disadvantages of fiber reinforcement:
- Doesn’t replace structural reinforcement: Fiber provides crack control and surface improvement but doesn’t add significant load-carrying capacity. It’s not a substitute for rebar in structural applications.
- Limited crack control compared to steel: While fiber helps with early-age cracks, it doesn’t control crack width as effectively as rebar or mesh in mature concrete.
- Can affect finishing: High fiber doses sometimes cause fibers to appear at the surface during finishing, creating a slightly fuzzy appearance. This usually isn’t problematic but can be noticeable on troweled finishes.
- Variable performance: Different fiber types and dosages provide very different performance. Under-dosing provides minimal benefit, and there’s no easy way to verify fiber content after delivery.
When It’s a Good Idea (Small Slabs, Complementing Rebar/Mesh)
Fiber is an excellent choice for small residential slabs where simplicity and early-age crack control matter more than structural capacity. A small patio, walkway, or shed pad benefits from fiber’s crack control without the labor investment of placing mesh or rebar. The convenience factor makes fiber attractive for DIY projects where positioning steel reinforcement correctly might be challenging.
Fiber also works well as a supplement to rebar or mesh on larger projects. Using fiber plus rebar provides both structural capacity and plastic shrinkage control—comprehensive reinforcement that addresses multiple failure modes. The cost of adding fiber to a project already using rebar is modest compared to the added protection.
For slabs with exposed surfaces where early-age cracking would be particularly visible or problematic, fiber’s plastic shrinkage control is valuable. Decorative concrete, stamped surfaces, and highly visible areas benefit from the crack reduction fiber provides during the vulnerable curing period.
Industrial floors and some commercial applications use macro-synthetic fibers or steel fibers as primary reinforcement, but these applications require engineering design and typically aren’t appropriate for DIY residential projects. Stick with micro-synthetic fiber for general crack control unless a structural engineer specifies otherwise.
Consider fiber your “insurance policy” against early-age surface cracking, particularly effective on small projects or as a supplement to steel reinforcement on larger ones.
DIY Pitfalls (Thinking It Replaces Rebar, Finishing Expectations)
The most significant fiber mistake is assuming it provides the structural capacity of rebar or mesh. Marketing materials sometimes oversell fiber’s capabilities, leading DIYers to use fiber alone on projects that need steel reinforcement. Fiber is excellent at what it does—controlling plastic shrinkage and surface cracking—but it doesn’t replace structural reinforcement.
If your project would benefit from rebar based on loads or application type, adding fiber doesn’t eliminate the need for rebar. Use both for comprehensive reinforcement, or if budget forces a choice, choose the reinforcement type that addresses your primary concern—structural capacity (rebar) or surface cracking (fiber).
Another mistake is not discussing fiber dosage with your concrete supplier. Fiber is effective only at appropriate doses measured in pounds per cubic yard. Under-dosing to save money provides minimal benefit. Over-dosing can create finishing difficulties and visible surface fibers. Your supplier can recommend appropriate dosing based on your project specifics.
Finishing expectations sometimes cause disappointment. While fiber shouldn’t dramatically affect finishing, high doses or certain fiber types can create a slightly different surface texture or occasionally cause fibers to appear at the surface. If you’re planning a highly finished surface or decorative treatment, discuss fiber finishing implications with your supplier.
Finally, some builders mistakenly believe fiber eliminates the need for control joints. It doesn’t. Fiber controls crack width and reduces surface cracking but doesn’t prevent shrinkage or thermal movement. Control joints remain necessary regardless of fiber reinforcement.
Use fiber for what it’s good at—plastic shrinkage control and surface crack reduction—while maintaining realistic expectations about what it cannot do.
Placement Basics (The Part That Decides If It Works)
Where It Should Sit (Middle Third) — “Supported, Not Buried”
Reinforcement must be positioned in the middle third to lower half of the slab thickness to resist tensile stress effectively. When a slab bends under load—whether from vehicles driving across it or settlement creating unsupported areas—the bottom face experiences tension while the top face experiences compression. Concrete handles compression well but fails in tension without reinforcement.
Reinforcement near the bottom face provides the tensile strength concrete lacks, preventing the slab from breaking when it bends. Reinforcement at the very bottom—sitting on the base or within the first half-inch—provides minimal benefit because it’s not positioned to resist the peak tensile stress that occurs slightly above the bottom surface.
Reinforcement too high in the slab is also ineffective. Steel near the top surface provides little resistance to bottom-face tension. It may control surface cracks somewhat but doesn’t address the primary failure mode of slabs under load.
The ideal position varies by slab thickness and reinforcement type, but as a general rule, reinforcement should be one-third of the way up from the bottom. In a six-inch slab, this means about two inches above the base. In a four-inch slab, about one and one-third inches above the base.
The phrase to remember is “supported, not buried”—reinforcement must be actively held at the correct height, not simply placed and allowed to sink to wherever it naturally settles.
Chairs / Dobies / Supports (Concept, No Brands)
Keeping reinforcement at the correct height requires physical supports that elevate it above the base and maintain that elevation during concrete placement. These supports come in several forms, each suited to different reinforcement types and slab conditions.
Plastic or metal chairs are purpose-made supports that sit on the base with an elevated platform that holds rebar or mesh at a specific height. They come in various heights corresponding to common slab thicknesses. Chairs designed for rebar have a different profile than those for mesh, though some multi-purpose designs handle both.
Dobies are small concrete or mortar blocks placed under reinforcement to elevate it. You can make these on-site from leftover concrete or mortar, creating custom heights as needed. Dobies work well but require advance preparation and can be time-consuming to position.
The quantity of supports matters enormously. Reinforcement must be supported frequently enough that it doesn’t sag between supports or shift during concrete placement. For rebar, place chairs every three to four feet along each bar. For mesh, support is needed more frequently—roughly every two to three feet in both directions.
Support placement is particularly critical in areas where workers will walk during concrete placement. Unsupported reinforcement flexes underfoot, eventually sagging to the base. Even well-supported reinforcement can be pushed down if workers repeatedly step in the same locations. Plan access paths that avoid stepping directly on reinforcement when possible.
Budget time and money for adequate supports—they’re not optional if reinforcement is going to provide the benefits you’re paying for.
Overlaps & Spacing (Principles, No Huge Tables)
Where reinforcement sections meet, adequate overlap ensures continuity and prevents weak points in the reinforcement pattern. Steel reinforcement works by distributing stress across connected sections. Short overlaps or missing connections create discontinuities where stress concentrates and cracks can widen.
For rebar, overlaps should be at least twelve inches, with bars tied together at the overlap. This length provides sufficient development of stress transfer between bars. Shorter overlaps don’t adequately transfer stress from one bar to the next, effectively creating a gap in reinforcement.
For welded wire mesh, overlaps should be at least six inches in both directions—meaning the wires running one direction overlap six inches, and the wires running perpendicular also overlap six inches. This creates overlapping grid sections that maintain reinforcement continuity.
Spacing between parallel reinforcement bars determines how effectively the reinforcement controls cracks and distributes stress. Too much spacing leaves areas with inadequate reinforcement. Too little spacing wastes money and can obstruct concrete flow during placement. Common residential practice spaces rebar twelve to eighteen inches on center in both directions, creating a grid pattern.
Mesh spacing is predetermined by the product specifications—6×6 mesh means six-inch spacing between wires in both directions. When choosing mesh, closer spacing provides more reinforcement but costs more. For typical residential slabs, 6×6 mesh with 10-gauge wire (10/10 designation) provides adequate reinforcement.
Follow basic overlap and spacing principles rather than obsessing over precise dimensions—the difference between twelve-inch and fourteen-inch spacing matters far less than whether reinforcement is properly elevated and positioned.
Edges & Thickened Edges (Where Reinforcement Matters More)
Slab edges are high-stress areas where reinforcement provides disproportionate benefit. The perimeter is vulnerable to impact, undermining from erosion, frost heaving in cold climates, and unsupported cantilever stress when the edge extends beyond the base. Reinforcement at edges holds everything together and prevents edge failures that often propagate into the slab interior.
For slabs with uniform thickness, make sure reinforcement extends close to all edges—typically within two to three inches of the form. Don’t leave the perimeter unreinforced because cutting reinforcement short was easier than fitting it close to forms. The edge is where you most need reinforcement’s protection.
Thickened edges—where the perimeter is poured deeper than the center—require special reinforcement consideration. The thickened edge acts as an integral footing or grade beam supporting the slab perimeter. This requires rebar placed specifically in the thickened section, typically near the bottom of the thickened portion.
If your project includes thickened edges, plan rebar placement carefully. The main slab reinforcement (whether rebar or mesh) provides crack control in the field of the slab. Additional rebar in the thickened edge provides structural support for the perimeter. These are separate functions requiring separate reinforcement placement.
Corners are particularly high-stress locations. Some builders add diagonal reinforcement at corners to control the cracking that often radiates from corner areas. This extra attention prevents corner failures that can occur even when the main slab is adequately reinforced.
Concentrate reinforcement placement effort at edges, corners, and thickened sections—these areas determine whether your slab develops edge cracks or remains intact for decades.
Common Placement Mistakes Checklist
Avoid these frequent reinforcement placement errors that waste money and provide no benefit:
- Reinforcement sitting on the base: This is the most common and most damaging mistake. Reinforcement at the very bottom provides almost no benefit. Use adequate supports to maintain proper elevation throughout placement. Check position after concrete is poured and before it sets—if reinforcement sank, it’s too late to fix once concrete hardens.
- Insufficient support spacing: Reinforcement needs frequent supports to prevent sagging between support points. Spacing supports too far apart to save money guarantees sagging that negates the reinforcement’s value. Support every three to four feet minimum for rebar, more frequently for mesh.
- Walking on reinforcement during placement: Workers stepping on mesh or rebar push it down, even when initially well-supported. Plan access paths, use walking boards to distribute weight, and verify reinforcement position periodically during placement rather than assuming it stayed where you put it.
- Short overlaps between sections: Minimal overlaps or skipped overlaps create weak points where cracks can open wide. Overlap adequately—twelve inches for rebar, six inches for mesh in both directions—and tie rebar overlaps together so they don’t separate.
- Reinforcement too close to surfaces: Rebar or mesh near the surface eventually rusts, causing spalling and deterioration. Maintain at least two inches of cover between reinforcement and any exposed surface. This includes the top surface, bottom surface, and edges.
- Ignoring edges and corners: Cutting reinforcement short of edges because it’s easier to place or leaving corners unreinforced wastes the opportunity to protect the most vulnerable areas. Extend reinforcement close to all edges and consider extra attention at corners.
- Mixing incompatible support types: Using supports designed for rebar to hold mesh, or vice versa, often results in reinforcement sliding off supports or supports tipping over. Use appropriate supports for your reinforcement type, and verify they’re rated for the weight and configuration you’re placing.
What to Choose by Project Type
| Project Type | Primary Reinforcement | Why / Notes |
|---|---|---|
| Patio / Walkway | Welded wire mesh (6×6 10/10) or fiber | Light loads need crack control, not structural capacity. Mesh provides adequate reinforcement with moderate labor. Fiber works for small or simple layouts. Either option combined with proper base and control joints prevents most problems. |
| Driveway (passenger vehicles) | Welded wire mesh or #3 rebar @ 18″ o.c. | Regular cars create moderate loads that mesh can handle, though rebar provides more confidence for long-term durability. Choice depends on builder preference and whether occasional heavier vehicles will use the driveway. Conservative approach uses rebar. |
| Driveway (trucks / RVs / heavy vehicles) | #4 rebar @ 12-18″ o.c. both directions | Heavy vehicles require structural reinforcement that only rebar provides. Mesh is inadequate for these loads. Use larger bar size (#4 instead of #3) and potentially closer spacing depending on vehicle weights. Consider thicker slab as well—6 inches minimum for heavy vehicles. |
| Garage floor | #3 or #4 rebar @ 18″ o.c. | Parked vehicles concentrate weight in small areas, creating bending stress that requires rebar. Mesh works for garages housing only small cars, but rebar is safer choice for mixed vehicle types or heavier vehicles. Add fiber for plastic shrinkage control during curing. |
| Shed / Workshop | Depends on loads and use | If slab simply provides level floor inside a building that sits on piers, mesh or fiber is adequate. If slab supports building walls and structural loads, use rebar at perimeter minimum. Heavy equipment or tool storage suggests rebar throughout. Evaluate based on actual use case. |
If you’re unsure which reinforcement your project needs, err on the side of more rather than less. The cost difference between mesh and rebar is modest compared to the cost of slab failure. And regardless of reinforcement choice, always combine it with proper base preparation and planned control joints. Reinforcement works with fundamentals, not instead of them.
Tools & Next Steps
Calculate Your Concrete Needs
Enter slab dimensions to get instant volume estimates and plan your concrete order with reinforcement considerations included.
Browse Common Slab Sizes
See pre-calculated concrete quantities for standard slab dimensions with reinforcement guidance.
Related calculators and resources:
- Bag Calculator – Convert cubic yards to bag quantities for small projects or repairs
- Concrete Calculator – General-purpose volume calculator with waste factors and cost estimates
Frequently Asked Questions
Does rebar prevent cracks?
No, rebar doesn’t prevent cracks from forming—it controls what happens after cracks appear. All concrete cracks to some degree due to shrinkage, thermal movement, and settlement. What rebar does is hold crack edges together, limiting crack width and maintaining load transfer across cracks. This makes cracks less visible and prevents them from becoming structural problems. Preventing cracks requires proper base preparation, control joints, appropriate mix design, and correct curing—rebar works with these fundamentals but doesn’t replace them.
Is mesh enough for a driveway?
Welded wire mesh can be adequate for driveways carrying only passenger vehicles, though rebar is the more conservative choice. Mesh provides reasonable crack control for lighter loads. If your driveway will see trucks, RVs, or heavy equipment, upgrade to rebar—mesh doesn’t provide the structural capacity those loads require. Consider also that driveways are long-term investments. The modest extra cost of rebar provides peace of mind that mesh might not deliver over decades of use.
Can fiber replace rebar?
No, fiber reinforcement does not replace rebar for structural applications. Fiber controls plastic shrinkage cracks during early curing and provides modest impact resistance, but it doesn’t add significant load-carrying capacity. If your project needs rebar based on loads or application type, fiber is not an adequate substitute. Fiber works well as a supplement to rebar—providing both structural reinforcement and plastic shrinkage control—but it cannot replace steel reinforcement in demanding applications.
Where should rebar or mesh sit in the slab?
Reinforcement should be positioned in the lower third to middle of the slab thickness, not sitting on the base. For a four-inch slab, this means about one and one-third to two inches above the base. For a six-inch slab, about two to three inches above the base. This position allows reinforcement to resist tensile stress on the bottom face when the slab bends under load. Reinforcement sitting on the base provides minimal benefit. Use chairs, dobies, or other supports to maintain proper elevation throughout concrete placement.
Do I need reinforcement for a small patio?
Small patios benefit from reinforcement, though the type can be simpler than larger or heavier-duty projects. Fiber reinforcement works well for small slabs—it’s easy to specify, requires no placement labor, and provides plastic shrinkage control. Welded wire mesh is another good option that adds crack control with modest labor. Even small slabs crack without reinforcement, and the cost of basic reinforcement is small compared to overall project cost. Combine any reinforcement with proper base preparation and at least one control joint for best results.
What about control joints—do I still need them?
Yes, reinforcement does not eliminate the need for control joints. Control joints provide planned weak points where cracks form in straight lines rather than random patterns. Reinforcement works with joints by holding crack edges together and limiting crack width, but it doesn’t prevent the shrinkage and thermal movement that cause cracking. Even heavily reinforced slabs need control joints. Plan joint locations before pouring and cut or tool them into the concrete during finishing or shortly after.
How do I avoid mesh sinking during the pour?
Use adequate supports and verify mesh position throughout concrete placement. Support mesh with chairs or dobies every two to three feet in both directions. When placing concrete, periodically check that mesh hasn’t been pushed down by concrete flow or workers walking on the slab. Some contractors initially support mesh slightly high, expecting some settling during placement. Others use walking boards to distribute worker weight and minimize stepping directly on mesh. The key is active verification rather than assuming mesh stays where you placed it.
Is rebar overkill for 4-inch slabs?
Rebar in four-inch slabs is appropriate when loads justify it, not overkill. Slab thickness and reinforcement serve related but different purposes. Thickness provides overall strength and rigidity. Reinforcement adds tensile capacity and crack control. A four-inch slab carrying heavy vehicles or equipment needs rebar regardless of thickness. A four-inch patio carrying furniture might not. Choose reinforcement based on loads and application, not simply on slab thickness. That said, if you’re pouring four inches and anticipating only light loads, mesh or fiber might provide adequate reinforcement at lower cost.
Can I use rebar and fiber together?
Yes, combining rebar and fiber provides comprehensive reinforcement addressing different crack types and failure modes. Rebar provides structural capacity and controls load-related cracks. Fiber controls plastic shrinkage cracks during early curing and improves impact resistance. Together they provide both structural reinforcement and surface crack protection. The cost of adding fiber to concrete that already includes rebar is modest—typically just a few dollars per cubic yard—making this combination attractive for important projects where you want maximum crack protection.
What if my concrete supplier recommends something different?
Local suppliers have experience with conditions in your area and their recommendations reflect what works in your specific climate and soil conditions. Regional practices vary based on freeze-thaw exposure, soil types, local building practices, and lessons learned from past projects. If your supplier recommends reinforcement different from general guidelines, ask why—understanding their reasoning helps you make informed decisions. Suppliers see the results of thousands of pours and know what succeeds and what fails in your area. Their advice is valuable even when it differs from national recommendations.
Do I need an engineer to specify reinforcement?
For typical residential slabs under normal conditions, engineering isn’t required—standard practices and supplier guidance suffice. However, some situations benefit from or require engineering: heavy structural loads beyond typical residential use, poor soil conditions requiring special foundation design, commercial or industrial applications, or local code requirements. If you’re unsure whether your project falls into normal parameters, a brief consultation with a structural engineer provides clarity. The cost of an engineer’s review is modest compared to the cost of undersized reinforcement that fails to prevent problems.
Ready to Plan Your Slab?
Disclaimer
This guide provides general information about reinforcement options for typical residential concrete slabs. Actual reinforcement requirements depend on loads, soil conditions, local building codes, and project specifics that vary by location. Verify local code requirements, consult with your concrete supplier about appropriate reinforcement for your region and application, and consider hiring a structural engineer for projects with unusual loads, poor soil conditions, or when local codes require engineered design. The information provided is for educational purposes and does not replace professional engineering judgment or code-required design for your specific project.