A properly prepared base is the most important factor in long-term concrete slab performance. While many DIYers focus on concrete thickness and reinforcement, the real key to preventing cracking, settlement, and drainage problems lies beneath the slab.
This guide explains how gravel selection, compaction techniques, and drainage planning work together to create a stable foundation that supports your concrete for decades. Whether you’re building a patio, driveway, or garage floor, understanding base preparation helps you avoid the most common—and most expensive—concrete failures.
Quick Answer
- The base provides uniform support that prevents differential settlement. Concrete is strong in compression but weak in tension. When the base settles unevenly, the slab bends and cracks. A well-compacted gravel base distributes loads and bridges over minor soil variations.
- Drainage matters more than most people realize. Water trapped under a slab creates pressure during freeze-thaw cycles, softens the subgrade, and causes erosion that leads to voids. Proper drainage—both surface and subsurface—keeps water away from the slab and prevents long-term problems.
- Compaction creates stability that loose material cannot provide. Uncompacted gravel shifts under load, creating the same settlement problems you’re trying to prevent. Proper compaction in thin layers locks particles together and creates a firm, stable platform.
- You cannot compensate for poor base preparation by pouring thicker concrete. A six-inch slab on a poorly prepared base will fail faster than a four-inch slab on properly compacted gravel. Base preparation and concrete thickness serve different purposes—both matter, but the base comes first.
Browse Pre-Calculated Slab Sizes
See ready-made concrete estimates for common slab dimensions—no measuring required.
Why Slab Base Prep Matters
Settlement and Uneven Support
Concrete slabs rely on continuous, uniform support from below. When the supporting material compresses unevenly—even by small amounts—the rigid concrete slab must bridge across the unsupported areas. This creates bending stress that concrete cannot resist indefinitely.
The result is cracking, often appearing within the first year after pouring. Native soil varies in density, composition, and moisture content across even small areas. Some spots compress more than others under the weight of concrete and whatever loads the slab carries.
A properly prepared gravel base averages out these variations, providing consistent support that prevents differential settlement. The base acts as a transition layer between inconsistent soil and the rigid concrete above.
Settlement problems compound over time. Initial small movements create stress concentrations that gradually worsen. Water infiltrates cracks, freeze-thaw cycles enlarge them, and what started as a hairline crack becomes a structural problem.
Preventing settlement through proper base preparation is far easier and cheaper than repairing failed concrete.
Drainage and Water Movement
Water is concrete’s most persistent enemy, and most water problems originate beneath the slab. When water accumulates under a slab, it softens clay soils, creates hydrostatic pressure, and in cold climates, expands during freezing to lift and crack the concrete.
Proper base preparation includes drainage considerations that keep water moving away from the slab rather than pooling beneath it. A well-draining gravel base allows water to percolate through rather than accumulating. The void spaces between gravel particles provide pathways for water movement.
When combined with proper site grading that directs surface water away from the slab perimeter, a draining base eliminates most moisture-related problems before they can affect the concrete.
Even in dry climates, drainage matters. Occasional heavy rains, irrigation systems, and natural groundwater movement can all introduce moisture beneath slabs.
Planning for drainage during base preparation costs little but prevents expensive problems that are difficult to fix after concrete is in place.
Cracking Is Often a Base or Joint Problem, Not a Thickness Problem
Most concrete cracks result from inadequate base preparation or missing control joints, not from insufficient concrete thickness. When homeowners see cracks, the natural response is to assume they should have poured thicker concrete.
In reality, a properly prepared base and appropriate control joints prevent most cracking regardless of thickness. Cracks form when tensile stress exceeds concrete’s relatively low tensile strength.
This stress comes from several sources: uneven settlement creates bending stress, restrained shrinkage during curing creates tension, and temperature changes cause expansion and contraction.
A stable base eliminates settlement stress, while control joints provide relief for shrinkage and thermal movement. Adding thickness doesn’t address the root causes.
This doesn’t mean thickness is irrelevant—heavier loads require thicker concrete to resist breaking. But for typical residential applications, proper base preparation and jointing matter more than the difference between four and six inches.
Invest in base quality first, then choose appropriate thickness for your specific loads and conditions.
Gravel vs Crushed Stone
Rounded Gravel vs Angular Crushed Stone
The terms “gravel” and “crushed stone” are often used interchangeably, but they describe different materials with different properties. Natural gravel consists of rounded stones worn smooth by water or glacial action. Crushed stone is manufactured by mechanically breaking larger rocks, creating angular particles with rough, fractured surfaces.
Angular crushed stone compacts more densely than rounded gravel because the rough edges interlock when compressed. This interlocking creates a more stable base that resists shifting under load.
Rounded gravel particles can roll past each other more easily, providing less resistance to movement. For slab bases where stability is paramount, crushed stone generally performs better than natural gravel.
However, rounded gravel drains slightly better than crushed stone because the smooth surfaces create larger void spaces that water can move through more freely. In situations where drainage is the primary concern—such as bases in areas with high water tables or heavy rainfall—rounded gravel may be preferable despite its lower stability.
Consider your site conditions when choosing between the two: prioritize stability on good-draining soils, prioritize drainage in wet conditions.
Drainage Logic: When to Prioritize Permeability
Base material selection depends on whether your site needs maximum stability or maximum drainage. Sites with clay soils, high water tables, or poor surface drainage benefit from more permeable base materials that allow water to escape.
Sites with sandy or gravelly native soil and good natural drainage can use denser, more stable materials that provide maximum support.
In many cases, you can combine both properties using a two-layer system: a lower layer of larger, open-graded stone for drainage, topped with a finer, well-graded crushed stone for stability and smooth leveling.
This approach provides drainage paths at the bottom while creating a firm, dense surface that directly supports the concrete. The thickness of each layer depends on your specific conditions—there’s no universal formula.
Don’t assume all projects need the same solution. A patio in well-drained soil can use simple compacted crushed stone. A garage floor in clay soil might need deeper drainage layers with perforated pipe to carry water away.
Evaluate your site, consider how water moves through it naturally, and design your base to work with those conditions rather than fighting them.
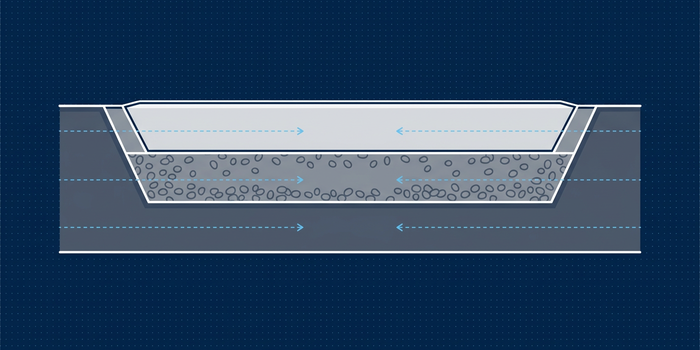
When a Leveling Layer Helps
A thin layer of finer material on top of your main base creates a smooth, level surface for concrete placement. This leveling layer—sometimes called “breeze,” “screenings,” or “fines”—fills small voids between larger stones and provides a uniform surface that prevents concrete from sagging into gaps.
It makes screeding easier and more accurate. The leveling layer should be thin—typically just enough to fill voids and create smoothness. Too much fine material can trap water and reduce drainage.
The goal is a firm, smooth surface, not a thick layer of loose sand. Many contractors use the coarse material from their main base, screeded smooth, without adding a separate leveling layer. Others add a thin layer of stone dust or similar material.
Whether you need a leveling layer depends on your base material and tolerance for minor surface irregularities. Coarse, open-graded drainage stone benefits from a leveling layer. Well-graded crushed stone that includes some fines can often be screeded smooth without additional material.
The key is achieving a firm, level surface—how you get there matters less than the result.
How Base Prep Affects Slab Thickness and Cracking
The Base Supports the Slab—It Doesn’t Replace It
Base material and concrete serve different structural roles that cannot substitute for each other. The base spreads loads over a larger area of native soil and provides a stable, uniform platform. The concrete slab resists concentrated loads, provides a smooth surface, and ties the structure together.
Both are necessary; neither replaces the other. Some builders incorrectly assume that a thicker base allows thinner concrete, or vice versa.
In reality, base thickness depends on soil conditions and drainage needs, while concrete thickness depends on the loads the slab must carry. A well-prepared base makes concrete perform better at any thickness, but it doesn’t reduce the thickness needed for a given load.
Similarly, you cannot fix bad base preparation by pouring thicker concrete. If your base is soft, uncompacted, or poorly draining, thick concrete will crack just as quickly as thin concrete—it just costs more.
Always prepare an adequate base first, then choose concrete thickness based on your specific loading requirements.
Common Use Cases and Typical Approaches
Different projects have different base requirements based on soil conditions, drainage needs, and expected loads. Here’s how base preparation typically scales for common residential applications:
- Patios and walkways: Light foot traffic and furniture loads allow simpler base preparation. On stable, well-draining soil, a moderate layer of compacted crushed stone provides adequate support. These projects prioritize drainage at the perimeter—keep water flowing away from the slab edges. Poor soil conditions may require deeper excavation and more substantial base layers.
- Driveways and garage floors: Vehicle loads and potential settlement under parked vehicles demand careful base preparation. These projects typically need thicker base layers, thorough compaction, and attention to areas where turning vehicles concentrate stress. Garage floors built on fill or disturbed soil need special attention to prevent settlement. Poor compaction here leads to expensive cracking within months.
- Shed pads and light structures: Base requirements depend on whether the slab simply provides a level surface or actually supports building loads. A shed sitting on piers or blocks needs only a simple base under a floor slab. A shed with walls bearing directly on the slab perimeter needs more substantial base preparation at the edges. Consider both the immediate loads and long-term settlement potential.
Edge Areas, Transitions, and High-Stress Zones
Slab edges and areas where loads concentrate need extra attention during base preparation. The perimeter of a slab is vulnerable to erosion, frost heaving, and undermining from water flow.
Vehicle turning areas on driveways experience higher stress than straight sections. Entry points where heavy equipment crosses during construction can develop soft spots if not properly recompacted.
Many contractors thicken the slab at edges or provide deeper base compaction at the perimeter. This extra effort prevents edge settlement that can crack the slab or create trip hazards.
Transitions between different materials—such as where a concrete driveway meets an asphalt street—need careful grading and compaction to prevent differential movement at the joint.
Mark high-traffic and high-stress areas during planning so you can give them extra attention during base preparation. A few minutes of additional compaction effort in vulnerable areas prevents problems that are expensive and difficult to repair later.
Base preparation isn’t uniform across the entire slab—concentrate effort where it matters most.
Related Guide: Choosing Slab Thickness
Not sure whether your project needs 4-inch or 6-inch concrete? Our thickness guide explains when to use each option and how loads affect thickness requirements.
Compaction Basics
Why Compaction Matters
Loose gravel compresses under load, creating the settlement you’re trying to prevent. Compaction removes air voids between particles, packs them tightly together, and creates a stable mass that resists further compression.
Properly compacted base material behaves almost like solid rock, while loose material continues settling for months or years.
The goal of compaction is to achieve density close to what the material would eventually reach naturally—but do it immediately rather than waiting for traffic and time to compress it.
Every concrete slab represents tons of weight concentrated in one area. Add vehicle loads, furniture, or stored materials, and the forces increase substantially. Compaction prevents this weight from compressing your base after the concrete is poured.
Skipping or rushing compaction is one of the most common base preparation mistakes. Gravel may look firm and stable when first spread, but without compaction it will compress significantly under concrete weight.
This compression occurs unevenly, creating the differential settlement that cracks slabs. The time and effort invested in thorough compaction pays back many times over in slab longevity.
Plate Compactor vs Hand Tamper
Mechanical plate compactors provide far more effective compaction than hand tamping. A plate compactor uses vibration to reorganize particles into tighter configurations while applying downward force. This combination achieves density that hand tampers cannot match.
For any project larger than a small walkway, renting a plate compactor is worthwhile.
Hand tampers work for very small areas, tight corners, or locations where a plate compactor won’t fit. They’re adequate for leveling thin layers or touching up areas that equipment can’t reach.
Don’t attempt to hand-tamp an entire driveway or garage floor base—the results will be inconsistent and inadequate. For residential projects, a plate compactor appropriate for the job size is the right tool.
Plate compactors come in different sizes and power levels. Small units work well for walkways and patios. Larger, more powerful units are necessary for thicker base layers under driveways and garage floors.
Rental centers can recommend appropriate equipment based on your project scope. Using equipment matched to your needs makes compaction faster and more effective.
Compaction in Lifts: The Layer Concept
Effective compaction requires working in thin layers called “lifts” rather than spreading and compacting thick layers all at once. Compaction energy dissipates with depth—a plate compactor might effectively compact the top few inches while leaving material below loose and unstable.
Working in lifts ensures compaction throughout the entire base thickness. The appropriate lift thickness depends on your compaction equipment and base material. More powerful equipment can compact thicker lifts. Smaller particles compact more easily than larger stones.
As a general principle, keep lifts thin enough that your compaction equipment can effectively compress the entire layer. Multiple thin lifts produce better results than fewer thick ones.
After spreading each lift, make multiple passes with your compactor, overlapping passes to ensure complete coverage. Change direction between passes to compact from different angles.
Continue until the material shows no visible movement and the compactor no longer sinks into the surface. Then add the next lift and repeat. Patience during compaction prevents problems later.
Quick Field Checks for Adequate Compaction
While professional compaction testing requires specialized equipment, simple field checks indicate whether you’ve achieved adequate compaction for residential projects. These checks aren’t precise measurements but provide practical guidance:
- Firm feel: Walk across the compacted surface. It should feel solid and stable under your weight, with minimal give or movement. If you can easily push stones around with your foot or feel springiness, you need more compaction.
- Minimal footprints: Your footprints should barely indent the surface. Deep footprints or visible displacement indicate loose material that needs additional compaction passes. Well-compacted material resists surface disturbance.
- No visible movement: When the compactor passes over properly compacted material, particles should not shift or reorganize visibly. If you see stones moving or the surface rippling ahead of the compactor, make additional passes until movement stops.
- Consistent density: Test multiple areas across your base, especially corners and edges where compaction is more difficult. Consistency matters—the weakest areas determine slab performance. Problem spots need extra attention even if most of the base feels solid.
Drainage and Slope Planning
Keep Water Away From the Slab
Surface water flowing toward a slab creates problems both above and below the concrete. Water that ponds against slab edges infiltrates beneath the perimeter, softening the base and creating voids through erosion.
In cold climates, this water freezes and expands, lifting and cracking the concrete. Prevention is simple: ensure the ground slopes away from all slab edges.
Proper site grading directs water away from structures and paved areas. The surrounding soil should slope gently away from the slab in all directions, carrying water toward drainage areas where it can safely dissipate.
Even a subtle slope is effective—water naturally flows downhill given any gradient. Flat or reverse-sloped areas that direct water toward the slab guarantee future problems.
Pay special attention to areas where downspouts discharge, where paved surfaces meet soil, and where natural drainage patterns concentrate flow. These high-volume areas need clear paths that carry water well away from the slab.
Splash blocks under downspouts, swales that channel water around structures, and proper finish grading after construction all contribute to keeping water away from your concrete.
Prevent Trapped Water Under the Slab
Water accumulating beneath a slab creates hydrostatic pressure, softens clay subgrades, and in freezing climates causes heaving and cracking. A well-draining base material allows water to move through rather than pooling.
Combined with proper site grading that prevents surface water from reaching the slab perimeter, a draining base keeps the area under your concrete dry.
In situations with high water tables, poor drainage soils, or sites at the bottom of slopes where water naturally accumulates, more aggressive drainage measures may be necessary.
This can include deeper excavation filled with drainage stone, perforated drain pipes that carry water away, or even subsurface drainage systems that intercept groundwater before it reaches the slab area.
The need for these advanced drainage solutions depends on site conditions. Well-drained soils on slopes that naturally shed water need minimal drainage consideration beyond basic grading.
Flat sites with clay soils and visible water problems need comprehensive drainage planning. Evaluate your specific site honestly—don’t assume problems will resolve themselves after construction.
Gutters, Downspouts, and Grading Basics
Roof drainage often represents the largest concentrated water source near slabs. A typical residential roof collects hundreds of gallons during heavy rain. Discharging this water near slab edges through improperly positioned downspouts creates severe localized erosion and infiltration problems.
Extend downspouts well beyond the slab perimeter and direct discharge away from structures.
After rough grading and base preparation but before pouring concrete, verify that your finish grade will slope away from the slab. Mark the planned finish grade at key points around the perimeter so you can see the drainage pattern.
This is your last chance to correct grading problems easily. After concrete is in place, fixing poor drainage requires major earthwork and expense.
Simple solutions prevent most drainage problems: slope the ground away from all edges, extend downspouts beyond the immediate area, fill low spots that might collect water, and create clear paths for water to flow away from the slab.
Good drainage doesn’t require expensive engineering—it requires attention to how water naturally moves across your site.
Vapor Barrier (When It Matters)
When Vapor Barriers Are Commonly Used
Vapor barriers—typically polyethylene plastic sheeting placed between the base and concrete—prevent moisture from migrating upward through the slab. They’re most commonly used under interior slabs like garage floors, basement floors, and slabs inside conditioned buildings where moisture vapor can cause problems with flooring materials, create humidity issues, or damage stored items.
Building codes often require vapor barriers under interior slabs, particularly in residential construction where moisture control matters for comfort and building durability. The barrier prevents soil moisture from evaporating into the building through the concrete.
Without this protection, moisture can cause flooring failures, mold growth, and other moisture-related problems inside conditioned spaces.
Under slabs that will receive moisture-sensitive floor coverings—such as hardwood, vinyl, or carpet—vapor barriers are particularly important. These materials can degrade, delaminate, or support mold growth when exposed to moisture from below.
Even concrete itself can be damaged by moisture-related problems like alkali-aggregate reaction if conditions allow persistent moisture exposure.
When Vapor Barriers May Be Unnecessary
Exterior slabs like patios, walkways, and exposed driveways typically don’t need vapor barriers. These applications are already exposed to weather, so preventing moisture migration from below serves no purpose.
Additionally, vapor barriers can trap water that enters from above, potentially creating more problems than they solve in outdoor applications.
Some experts question vapor barriers even under interior slabs in well-drained conditions, arguing that they can interfere with concrete curing, trap bleed water, and create problems during placement. Modern concrete mix designs with low water-cement ratios may cure better without barriers in some situations.
This remains a debated topic with strong opinions on both sides.
If you do use a vapor barrier, proper installation matters enormously. The plastic must be continuous with overlapped and sealed seams, free of punctures, and placed on a smooth leveling layer that won’t puncture it.
Improper installation—torn plastic, inadequate overlap, or placement directly on sharp stone—provides the disadvantages of a barrier without the moisture protection benefits.
Region-Dependent Considerations
Climate, soil moisture conditions, and local building practices all influence vapor barrier decisions. Humid climates with high water tables may require vapor barriers in more situations than arid climates with deep groundwater.
Local building codes reflect regional experience and typically specify when barriers are required for code compliance.
Some regions experience seasonal frost that creates different moisture dynamics than non-freezing climates. Coastal areas face different moisture conditions than inland locations. Urban sites with modified drainage patterns differ from rural sites with natural drainage.
What works in one region may be unnecessary or even problematic in another.
Consult local building codes, experienced contractors in your area, and your concrete supplier for guidance appropriate to your specific location. National recommendations provide general principles, but local practice reflects generations of experience with conditions in your region.
Don’t assume solutions from other climates or soil types will work identically at your site.
Common Base Mistakes (Checklist)
Avoiding these frequent base preparation errors significantly improves slab performance:
- Leaving soft spots or organic soil: Topsoil, roots, organic material, and soft clay compress dramatically under load. Excavate to stable material and remove all organic content. Soft spots that feel spongy when walked on need additional excavation and replacement with compacted structural fill. One soft area can crack an entire slab.
- Skipping or rushing compaction: Spreading gravel and calling it “done” without thorough compaction creates a base that will compress under load. Every lift needs multiple compactor passes from different directions until no movement is visible. Rushing this step to save time guarantees problems that cost far more to fix than proper compaction takes.
- Ignoring drainage paths: Flat areas that trap water, slopes that direct water toward the slab, and missing or inadequate drainage provisions all create moisture problems beneath the concrete. Walk your site during rain to see where water naturally flows. Plan your grading to work with natural patterns, not against them.
- Relying on thickness instead of preparation: Pouring six inches of concrete on a poorly prepared base costs more than four inches on good base, and performs worse. The base must be right regardless of concrete thickness. Don’t assume extra concrete compensates for base shortcuts—it doesn’t.
- Using inconsistent materials: Mixing clay soil with gravel, using materials with excessive fines that don’t drain, or incorporating debris and organic material creates an unstable base with inconsistent properties. Use clean, appropriate stone throughout. Trying to save money with marginal materials costs more in the long run.
- Failing to recompact after utility work: Trenches for electrical, plumbing, or other utilities that cross under slab areas must be thoroughly recompacted after backfilling. These disturbed areas will settle if not properly compacted, creating linear cracks or depressions above the trench. Treat utility crossings as high-risk zones needing extra attention.
Tools & Size Pages
Calculate Exact Volumes
Enter your slab dimensions and get instant estimates for cubic yards, cubic feet, and bag quantities.
Browse Pre-Calculated Sizes
Explore common slab dimensions with ready-made concrete quantity estimates.
Related calculators:
- Concrete Calculator – General-purpose volume calculator with waste factors
- Bag Calculator – Convert cubic yards to bag quantities for small projects
Frequently Asked Questions
Do I need a gravel base for every concrete slab?
Nearly all concrete slabs benefit from a prepared base, though the depth and complexity vary by project. Stable, well-draining soil with minimal organic content might need only modest base preparation. Poor soil, high water tables, or heavy loads require more substantial base layers. Even simple projects benefit from at least basic compaction and drainage consideration. The few situations where concrete can be poured directly on soil—solid bedrock, for example—are rare. Plan on proper base preparation for virtually every residential slab project.
Gravel vs crushed stone—which is better under a concrete slab?
Crushed stone generally provides better stability due to angular particles that interlock when compacted. Natural rounded gravel drains slightly better but compacts less densely. For most residential slabs, crushed stone offers the best balance of stability and drainage. In situations where drainage is the primary concern—high water tables, clay soils, or wet sites—consider using rounded gravel or a two-layer system with drainage stone below and crushed stone on top. Your specific soil conditions and drainage needs should guide material selection more than rigid rules.
What if my soil is clay that holds water?
Clay soils require extra attention to base preparation and drainage. Clay expands when wet and shrinks when dry, creating movement that stresses concrete. It also drains poorly, allowing water to accumulate beneath slabs. For clay sites, excavate deeper, use more substantial base thickness, ensure good drainage provisions, and consider perimeter drainage systems if water problems are severe. A thicker base of well-draining stone helps isolate the concrete from clay movement below. Don’t try to pour directly on clay or use minimal base preparation—clay soils demand comprehensive site work for good slab performance.
Do I need a vapor barrier under an outdoor patio?
No, exterior slabs like patios, walkways, and driveways typically don’t need vapor barriers. These applications are exposed to weather, so preventing moisture from below serves no purpose. Vapor barriers are primarily for interior slabs where moisture control matters—garage floors, basement slabs, and slabs inside conditioned buildings. For outdoor applications, focus on drainage and proper grading rather than vapor barriers. A vapor barrier under an exterior slab might even trap water that enters from above, creating more problems than it solves.
Can I pour concrete directly on dirt?
Pouring directly on soil is rarely appropriate and typically leads to cracking and settlement problems. Soil compresses unevenly under load, lacks the drainage properties of gravel, and often contains organic material that decomposes over time. Even projects with good native soil benefit from at least basic base preparation—removing organic material, achieving level grade, and compacting the subgrade. The minimal cost of proper base preparation prevents expensive concrete failures. The rare situations where direct-on-soil placement might work—solid bedrock or extremely stable, uniform sand—represent a tiny fraction of projects. Plan on proper base preparation for virtually all residential concrete work.
Does a better base reduce concrete cracking?
Yes, proper base preparation is one of the most effective ways to prevent concrete cracking. Most cracks result from differential settlement, where uneven support creates bending stress concrete cannot resist. A well-prepared, uniformly compacted base provides consistent support that eliminates settlement-related cracking. Good drainage prevents moisture problems that weaken soil and cause movement. While proper base prep can’t prevent all cracks—shrinkage cracks from curing and thermal movement still occur—it eliminates the most common and most damaging crack causes. Investing in quality base preparation prevents far more cracking than spending the same money on thicker concrete or premium reinforcement.
How do I know if my base is compacted enough?
For residential projects, simple field checks provide practical guidance even without professional testing equipment. Walk across the surface—it should feel solid with minimal give. Footprints should barely indent the surface. When you run the compactor over properly compacted material, particles should not shift or move visibly. The surface should resist disturbance when you try to push stones around with your foot. Make multiple compaction passes until you see no further densification. Check multiple areas, especially corners and edges. Consistent density across the entire base matters more than achieving a specific number in any one location. When in doubt, make additional compaction passes—you can’t over-compact within reason.
Should I compact the soil before adding gravel?
Yes, compacting the exposed subgrade before placing your gravel base removes soft spots and creates a firm foundation. This step is particularly important if the area was recently excavated, is over utility trenches, or consists of fill material. Native soil that hasn’t been disturbed may need only light compaction or none at all if it’s naturally firm. Disturbed, loose, or questionable soil should be compacted before adding base layers. This ensures your entire foundation—both native soil and added base—provides uniform support. Skipping subgrade compaction and only compacting the gravel layers leaves a weak zone at the bottom of your base.
What’s the minimum base thickness I can use?
Base thickness depends on soil quality, drainage needs, and expected loads rather than following universal minimums. Good soil might need only modest base depth, while poor soil requires substantial base layers to bridge over problem areas. Rather than focusing on minimum thickness, think about what your base must accomplish: provide uniform support, allow drainage, and create a stable platform. Achieve those goals with whatever thickness is necessary for your specific conditions. Trying to meet an arbitrary minimum while ignoring actual site needs leads to inadequate preparation. Evaluate your soil, consider drainage, plan for loads, and build the base those conditions require.
Can I use sand instead of gravel for a slab base?
Sand alone typically makes a poor base for concrete slabs. While sand can be compacted, it doesn’t provide the structural stability of larger aggregate. Sand also traps water rather than draining freely, creating moisture problems beneath the slab. Some builders use a thin layer of sand over gravel as a leveling layer, but sand should not be the primary base material. Use angular crushed stone or gravel as your main base, and reserve sand for minor leveling or specific applications where its properties are appropriate. A gravel base with optional sand leveling layer performs far better than a sand-only base.
Ready to Estimate Your Slab?
Disclaimer
This guide provides general information about concrete slab base preparation for typical residential projects. Actual base requirements vary by site conditions, local codes, soil type, and project specifics. Verify local building requirements, consult with your concrete supplier about appropriate materials and techniques for your region, and consider hiring a qualified professional for projects with challenging site conditions, poor soil, or structural loads. The information provided is for educational purposes and does not replace professional site evaluation or engineering judgment for your specific project.