Accurate measurements are the foundation of every successful concrete project. Whether you’re planning a simple rectangular patio or a complex curved walkway, knowing how to measure your slab area correctly ensures you order the right amount of concrete and avoid costly shortages or expensive overages. This guide walks you through the complete measuring process, from gathering the right tools to handling irregular shapes, with practical tips that work in real-world conditions.
Quick Answer
Measure Length × Width for Rectangles
For rectangular slabs, measure the inside length and width of your forms and multiply them together to get square footage. This is the actual area where concrete will be poured. Always measure in feet or convert inches to feet for consistency with concrete calculations.
Convert Thickness to Feet
Thickness must be in feet for volume calculations. Divide your thickness in inches by twelve to convert to feet. This conversion is essential for calculating cubic yards correctly.
Add a Small Waste Buffer
Always add five to ten percent extra to your calculated volume to account for measurement variations, uneven subgrade, spillage, and over-excavation. This buffer prevents running short during your pour. It’s better to have a small amount left over than to stop pouring before your forms are filled.
Browse Pre-Calculated Slab Sizes
See concrete estimates for common slab dimensions—no measuring or math required.
Tools You Need to Measure a Slab
Having the right measuring tools makes the job faster, more accurate, and less frustrating. You don’t need expensive equipment—basic tools from any hardware store work perfectly for residential concrete projects.
Tape Measure
A quality tape measure is essential for measuring slabs. Choose one with a sturdy blade that stays rigid when extended and clear markings that are easy to read. Standard tape measures work well for most residential projects. For larger areas like driveways, consider a longer tape or a fiberglass measuring tape for easier handling. The hook end should be secure and accurate. Cheap tape measures with loose hooks or bent blades introduce errors that compound across your project.
For very long measurements, a fiberglass measuring tape or wheel-type distance measurer makes the job easier and more accurate than trying to extend a standard tape measure multiple times. Digital laser measuring tools work well but can struggle outdoors in bright sunlight or over rough terrain.
Stakes and String Line
Stakes and mason’s string help establish straight reference lines for measuring and checking squareness. Drive stakes at corners and pull taut string between them to visualize your slab boundaries. This makes it easier to check that your forms are straight and properly aligned before measuring.
Brightly colored string or chalk line is easier to see than white string, especially on dirt or gravel. Make sure your string is pulled tight—sagging string gives inaccurate measurements. For curved sections, stakes help mark key points along the curve that you can measure between.
Marker, Chalk, or Spray Paint
Marking your measuring points prevents confusion and helps verify measurements. Use construction marking paint to mark corners, section divisions, and key reference points on the ground. Chalk works on hard surfaces like existing concrete. Permanent markers or pencil work on wood forms.
When breaking irregular shapes into smaller sections, clearly mark where each section begins and ends. Label your marks if measuring multiple areas—it’s easy to confuse which measurement corresponds to which section. Take photos of marked areas with measurements written on the ground or forms for reference later.
Level or Straight Board (Optional)
While not required for measuring area, a level helps verify that your forms are properly aligned and at consistent height. This ensures uniform slab thickness across the entire pour. A long, straight board also helps check that forms are straight rather than bowed.
For sloped slabs like driveways, a level helps you determine if thickness varies and whether you need to average measurements for volume calculations. Significant slope means different thickness at different points, which affects concrete quantity.
How to Measure a Rectangular Slab
Rectangular slabs are the simplest to measure and calculate. Following a systematic approach ensures accuracy and helps you catch mistakes before ordering concrete.
Measure Inside the Forms
Always measure the inside dimensions of your forms, not the outside. The inside measurement represents the actual area that will be filled with concrete. Measuring the outside includes the thickness of your form boards and gives an inflated area calculation.
For a typical rectangular slab, measure the length along one side from inside edge to inside edge of the forms. Then measure the width perpendicular to your length measurement. Write down both measurements immediately—relying on memory leads to mistakes. If possible, have someone verify your measurements by measuring independently.
Take measurements in multiple locations along each dimension. Forms can bow or shift slightly during installation. If your length varies by more than an inch or two, your forms may need adjustment. Use the average of multiple measurements for best accuracy on imperfect forms.
Double-Check Squareness with Diagonal Measurements
A square or rectangular slab should have equal diagonal measurements. Measure from one corner to the opposite corner diagonally, then measure the other diagonal. If these measurements are equal, your slab is square. If they differ, your corners aren’t true right angles and you need to adjust your forms.
The diagonal check catches out-of-square conditions that aren’t obvious by eye. Even if your corners look square, measuring confirms it. For a perfect rectangle, both diagonals must be identical. If they’re off by more than an inch on residential slabs, adjust the forms until diagonals match.
You can also use the 3-4-5 triangle method to check squareness: measure three units along one side from a corner, mark that point, then measure four units along the adjacent side and mark it. The distance between those two marks should be exactly five units if the corner is a perfect right angle. This method works at any scale—the proportions always hold true.
Note Thickness Separately
Thickness is a separate measurement from length and width. Measure the depth of your excavation or the height of your forms to determine slab thickness. Check thickness in multiple locations to ensure consistency. Uneven excavation means variable thickness, which affects concrete volume.
Measure thickness from the bottom of your excavation or base to the top edge of your forms. If you’ve installed a gravel base, subtract the base thickness to find concrete thickness. Understanding the distinction between total excavation depth and actual concrete depth prevents ordering errors.
Measuring Irregular Shapes
Not every slab is a simple rectangle. Walkways with curves, L-shaped patios, and custom designs require different measuring approaches. The key is breaking complex shapes into simpler sections you can measure and calculate individually.
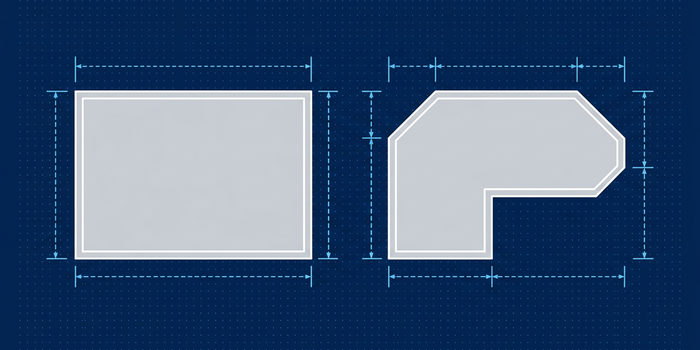
L-Shapes: Split Into Rectangles
L-shaped slabs are simply two rectangles joined together. Divide your L into two separate rectangular sections. Measure the length and width of each rectangle independently, calculate the area of each, then add them together for total area.
Choose your split line strategically to create the largest possible rectangles with the fewest measurements. Mark the division line clearly with chalk or spray paint so you can see exactly where one section ends and the other begins. Measure each rectangle carefully, treating it as its own independent slab.
Make sure you don’t overlap your rectangles or leave gaps when calculating. The division line should be counted in one rectangle only. Draw a simple sketch showing your sections with dimensions labeled—this visual reference prevents confusion when calculating and helps verify you haven’t missed any area.
Curves and Rounded Edges
Curved sections require approximation methods since perfect curves don’t have simple area formulas. Here are three practical approaches:
- Rectangle approximation: For gentle curves, approximate with rectangles by ignoring small curved portions. This works when the curved section is minimal compared to overall area.
- Average width method: Measure the length along the curved section, then measure width at several points along that length. Average the width measurements and multiply by length. This works well for curved walkways.
- Geometric formulas: For circular or semi-circular areas, use standard geometric formulas. A full circle is π × radius², a half-circle is half that, and a quarter-circle is one-quarter. Measure the radius from the center point to the edge.
For complex curves, breaking them into smaller straight segments and summing the areas provides reasonable accuracy. Another option is plotting the curve on graph paper at a known scale, counting squares inside the shape, and multiplying by the area each square represents.
Multiple Sections: Sum the Areas
When your project includes several separate sections, measure and calculate each one independently, then add all areas together. For example, a walkway connecting to a patio consists of two distinct sections. Calculate the walkway area separately from the patio area, then sum them for total concrete needs.
Create a simple table or list showing each section name, its dimensions, and calculated area. This organization prevents mistakes and makes it easy to verify your work. If sections have different thicknesses, you’ll need to calculate volume for each section separately using its specific thickness before adding volumes together.
Inside Forms vs Outside Forms
One of the most common measuring mistakes is measuring the wrong side of the forms. Understanding why inside measurements matter prevents ordering too much concrete and wasting money.
Why “Inside” Is What Matters
The inside dimension of your forms represents the actual space that will be filled with concrete. Form boards—typically dimensional lumber—have thickness that adds to the overall perimeter but doesn’t contain concrete. Measuring outside dimensions includes this board thickness and inflates your area calculation.
Measuring outside instead of inside can inflate your area calculation by several percent, depending on your slab size and form board thickness. This translates directly to ordering and paying for concrete you don’t need. The larger your project, the more this error costs.
Always place your tape measure against the inside face of the form boards. This is where concrete will actually reach. Hook the tape on one inside edge and extend to the opposite inside edge. Ignore the form boards completely when measuring—they’re just containers, not part of the slab.
Common Mistakes: Measuring Outside and Over-Ordering
Measuring outside dimensions is the most frequent error DIY concrete builders make. It seems logical to measure the overall structure, but it results in ordering too much concrete. On small slabs, the error might only be a fraction of a cubic yard. On larger projects like driveways, it can mean ordering substantially more than needed.
Another mistake is measuring to the outside of one form and inside of the opposite form, or being inconsistent about measuring points. This introduces random errors that are hard to catch until you’re either short on concrete or have excess. Be systematic: always inside dimensions, always the same measuring technique, always verified.
If you’re working with curved forms or flexible form material, make sure the forms are pulled to their final shape before measuring. Forms that shift or change shape between measuring and pouring will give incorrect volume calculations.
Thickness: Converting Inches to Feet
Concrete calculations require thickness in feet, not inches. Converting properly is essential for accurate volume estimates in cubic yards.
Simple Conversion Rule
To convert inches to feet, divide the thickness in inches by twelve. This gives you the decimal feet value needed for volume calculations. For example, 4 inches ÷ 12 ≈ 0.33 feet, and 6 inches ÷ 12 = 0.5 feet.
Most calculators handle this conversion automatically, but understanding it helps you verify results and catch input errors. If you’re calculating by hand, always convert thickness to feet before multiplying by area. Multiplying feet by inches gives meaningless numbers that don’t represent cubic yards.
Write down your converted thickness next to your area measurements so you don’t forget to use the right value. It’s easy to accidentally use the inch value instead of the converted feet value, especially if you’re doing multiple calculations or working on a project over several days.
Common Thickness Examples
Here are standard residential slab thicknesses converted to feet for quick reference:
- 3 inches = 0.25 feet (rare, very light duty only)
- 4 inches ≈ 0.33 feet (standard patios, walkways)
- 5 inches ≈ 0.42 feet (some driveways, light garages)
- 6 inches = 0.5 feet (driveways, garage floors, heavy-duty slabs)
Using these standard conversions prevents calculation errors. You can also use our Slab Calculator which handles all conversions automatically and eliminates the risk of math mistakes.
Worked Examples
Seeing complete examples from measurement through calculation helps clarify the process and shows how all the pieces fit together.
Example 1: Simple Rectangular Patio
Project: Rectangular backyard patio
Measurements:
- Length (inside forms): 12 feet
- Width (inside forms): 10 feet
- Thickness: 4 inches
Calculation:
First, calculate area: 12 ft × 10 ft = 120 square feet
Convert thickness to feet: 4 inches ÷ 12 ≈ 0.33 feet
Calculate volume: 120 sq ft × 0.33 ft = 40 cubic feet
Convert to cubic yards: 40 cubic feet ÷ 27 ≈ 1.48 cubic yards
Add waste buffer (10%): 1.48 × 1.10 ≈ 1.63 cubic yards
Result: Approximately 1.6 to 1.7 cubic yards (round up based on supplier order increments and delivery minimums)
Example 2: L-Shaped Driveway Extension
Project: L-shaped driveway with two distinct sections
Section 1 (Main driveway):
- Length: 20 feet
- Width: 12 feet
- Area: 20 × 12 = 240 square feet
Section 2 (Side extension):
- Length: 10 feet
- Width: 10 feet
- Area: 10 × 10 = 100 square feet
Total area: 240 + 100 = 340 square feet
Thickness: 6 inches = 0.5 feet (driveways need thicker concrete)
Calculation:
Volume: 340 sq ft × 0.5 ft = 170 cubic feet
Convert to cubic yards: 170 ÷ 27 ≈ 6.3 cubic yards
Add waste buffer (10%): 6.3 × 1.10 ≈ 6.9 cubic yards
Result: Approximately 7 cubic yards (confirm final order amount with your supplier based on their delivery minimums and order increments)
Use the Calculator for Fast Estimates
While understanding manual calculations is valuable, using a calculator saves time and eliminates math errors. Our tools handle conversions, area calculations, and waste factors automatically.
Calculate Any Slab Size
Enter your measurements and get instant volume estimates with automatic unit conversions.
Browse Common Sizes
View pre-calculated concrete needs for standard slab dimensions.
When to Use the Bag Calculator
For very small projects under one cubic yard, you might mix concrete from bags instead of ordering ready-mix. Our Bag Calculator converts cubic yards to bag quantities and helps you compare the cost of bags versus ready-mix delivery. This is particularly useful for small repairs, post holes, or projects where access limits concrete truck delivery.
Frequently Asked Questions
Do I measure inside or outside the forms?
Always measure inside the forms. The inside dimensions represent the actual area that will be filled with concrete. Measuring outside includes the thickness of your form boards and results in over-ordering concrete. Place your tape measure against the inside face of the form boards and measure from inside edge to inside edge.
How do I measure curves or rounded edges?
For curves, use approximation methods or break them into smaller sections. Gentle curves can be approximated as rectangles by ignoring small rounded portions. For significant curves, measure the length along the curve and take width measurements at several points, then average the widths and multiply by length. Perfect circles or semi-circles can use geometric formulas: area = π × radius².
Do I need to add a waste factor to my measurements?
Yes, always add five to ten percent extra to your calculated volume. This waste factor accounts for measurement variations, uneven excavation, spillage during pouring, and over-excavation. It’s much better to have a small amount of concrete left over than to run short mid-pour and need an emergency partial delivery at premium cost.
What if my slab thickness varies across the area?
For sloped or uneven slabs, measure thickness at multiple points and use the average. Take measurements at the high point, low point, and several locations in between. Average these measurements to get a representative thickness for your volume calculation. Significant slope may require dividing the slab into sections with different average thicknesses.
How accurate do my measurements need to be?
Aim for accuracy within an inch on dimensions and a half-inch on thickness. Small measurement errors multiply through your calculations, so precision matters. That said, the waste factor you add provides buffer against minor inaccuracies. Being consistently accurate is more important than being perfectly precise—systematic errors cause more problems than random small variations.
Can I measure a slab that’s already poured?
Yes, you can measure existing slabs the same way you measure forms. Measure the length and width of the finished slab from edge to edge. To determine thickness, you’d need to drill or probe at the edge, or reference original construction documents if available. Measuring existing slabs is useful for planning additions or extensions that need to match existing thickness.
What’s the easiest way to check if my forms are square?
Measure both diagonals from corner to corner. If both diagonal measurements are equal, your forms are square. If they differ, your corners aren’t true right angles. You can also use the 3-4-5 triangle method: measure three units along one side from a corner, four units along the adjacent side, and verify the distance between those points is five units.
Should I measure before or after installing the base?
Measure both before and after base installation. Initial measurements help you plan your excavation and base material needs. After installing and compacting your gravel base, measure again to verify dimensions and check that your final thickness will be correct. The base installation process sometimes shifts forms slightly, so verification prevents surprises.
How do I measure a circular or curved walkway?
For long curved walkways, break them into shorter straight segments. Measure the length along the center line of the curve, then measure the width at multiple points along that length. If width is relatively consistent, multiply average width by length. For complex curves, divide into multiple sections and calculate each separately, then sum the areas.
What if I measure in inches instead of feet?
You must convert all measurements to the same unit before calculating. If you measure in inches, convert to feet by dividing by twelve. If you measure in feet and inches, convert the inches portion to decimal feet first. Our Slab Calculator accepts measurements in either unit and handles conversions automatically, eliminating this common source of errors.
How do I measure steps or multiple levels?
Measure each level or step as a separate slab with its own dimensions and thickness. Calculate the volume for each level independently, then add them together for total concrete needs. Don’t try to average or estimate across multiple levels—this introduces significant errors. Treat each distinct elevation as its own project for measuring purposes.
Can someone help me verify my measurements?
Having a second person verify measurements is excellent practice. Have them measure independently without seeing your numbers first, then compare results. If measurements differ by more than an inch or two, measure again together to find the correct values. Most concrete suppliers will also review your measurements over the phone and help verify your volume calculation before you place an order.
Ready to Calculate Your Concrete Needs?
Disclaimer
This guide provides general information about measuring concrete slabs for typical residential projects. Actual measurements should be verified on-site before ordering concrete. Always confirm your calculations with your concrete supplier and check local building code requirements for your specific project. The measuring techniques and calculator tools provided are for estimation purposes and do not replace professional measurement services or engineering calculations for complex projects.